

Create a contact
To create your customers and/or suppliers, go to the Contacts section in the top menu. Once in this section, you can create your customers in two ways:
1. Create a contact manually
Section titled “1. Create a contact manually”To create a new contact manually, once you are in the Contacts section, use the Add Contact option.
Identification
Section titled “Identification”- Through the Country dropdown, select your contact’s country. It comes preselected with your account’s country: change it if the customer is in another country. Check it at this step, because you can’t change it once the contact is created. The list shows each country under its official name in the interface language, and the search only finds that name: for example, search for «Netherlands», not «Holland».
- In the next box, add your contact’s Tax Identification Number.
If you have selected a country where companies can have different types of identifiers, the option You do not have (country identifier name) will be activated at the bottom. Activate it and you will be able to enter another type of identifier:
- Fill in the identifier information in the corresponding box.
- You can only enter one of the above mentioned identifiers to be able to invoice through B2Brouter.
Now two things can happen, depending on whether the company you are creating is in the B2Brouter directory (Verified data) or not (Unverified data):
The contact is in the B2Brouter directory.
Section titled “The contact is in the B2Brouter directory.”The information of the Fiscal data and the Invoice sending method of your contact are added automatically, using the data in the B2Brouter directory.
Use the Save option. The contact is created in B2Brouter and you can start invoicing.
The contact is not in the B2Brouter directory.
Section titled “The contact is not in the B2Brouter directory.”If the data are not entered automatically, it means that the company does not appear as verified in our directory. In this case, the contact data must be entered manually.
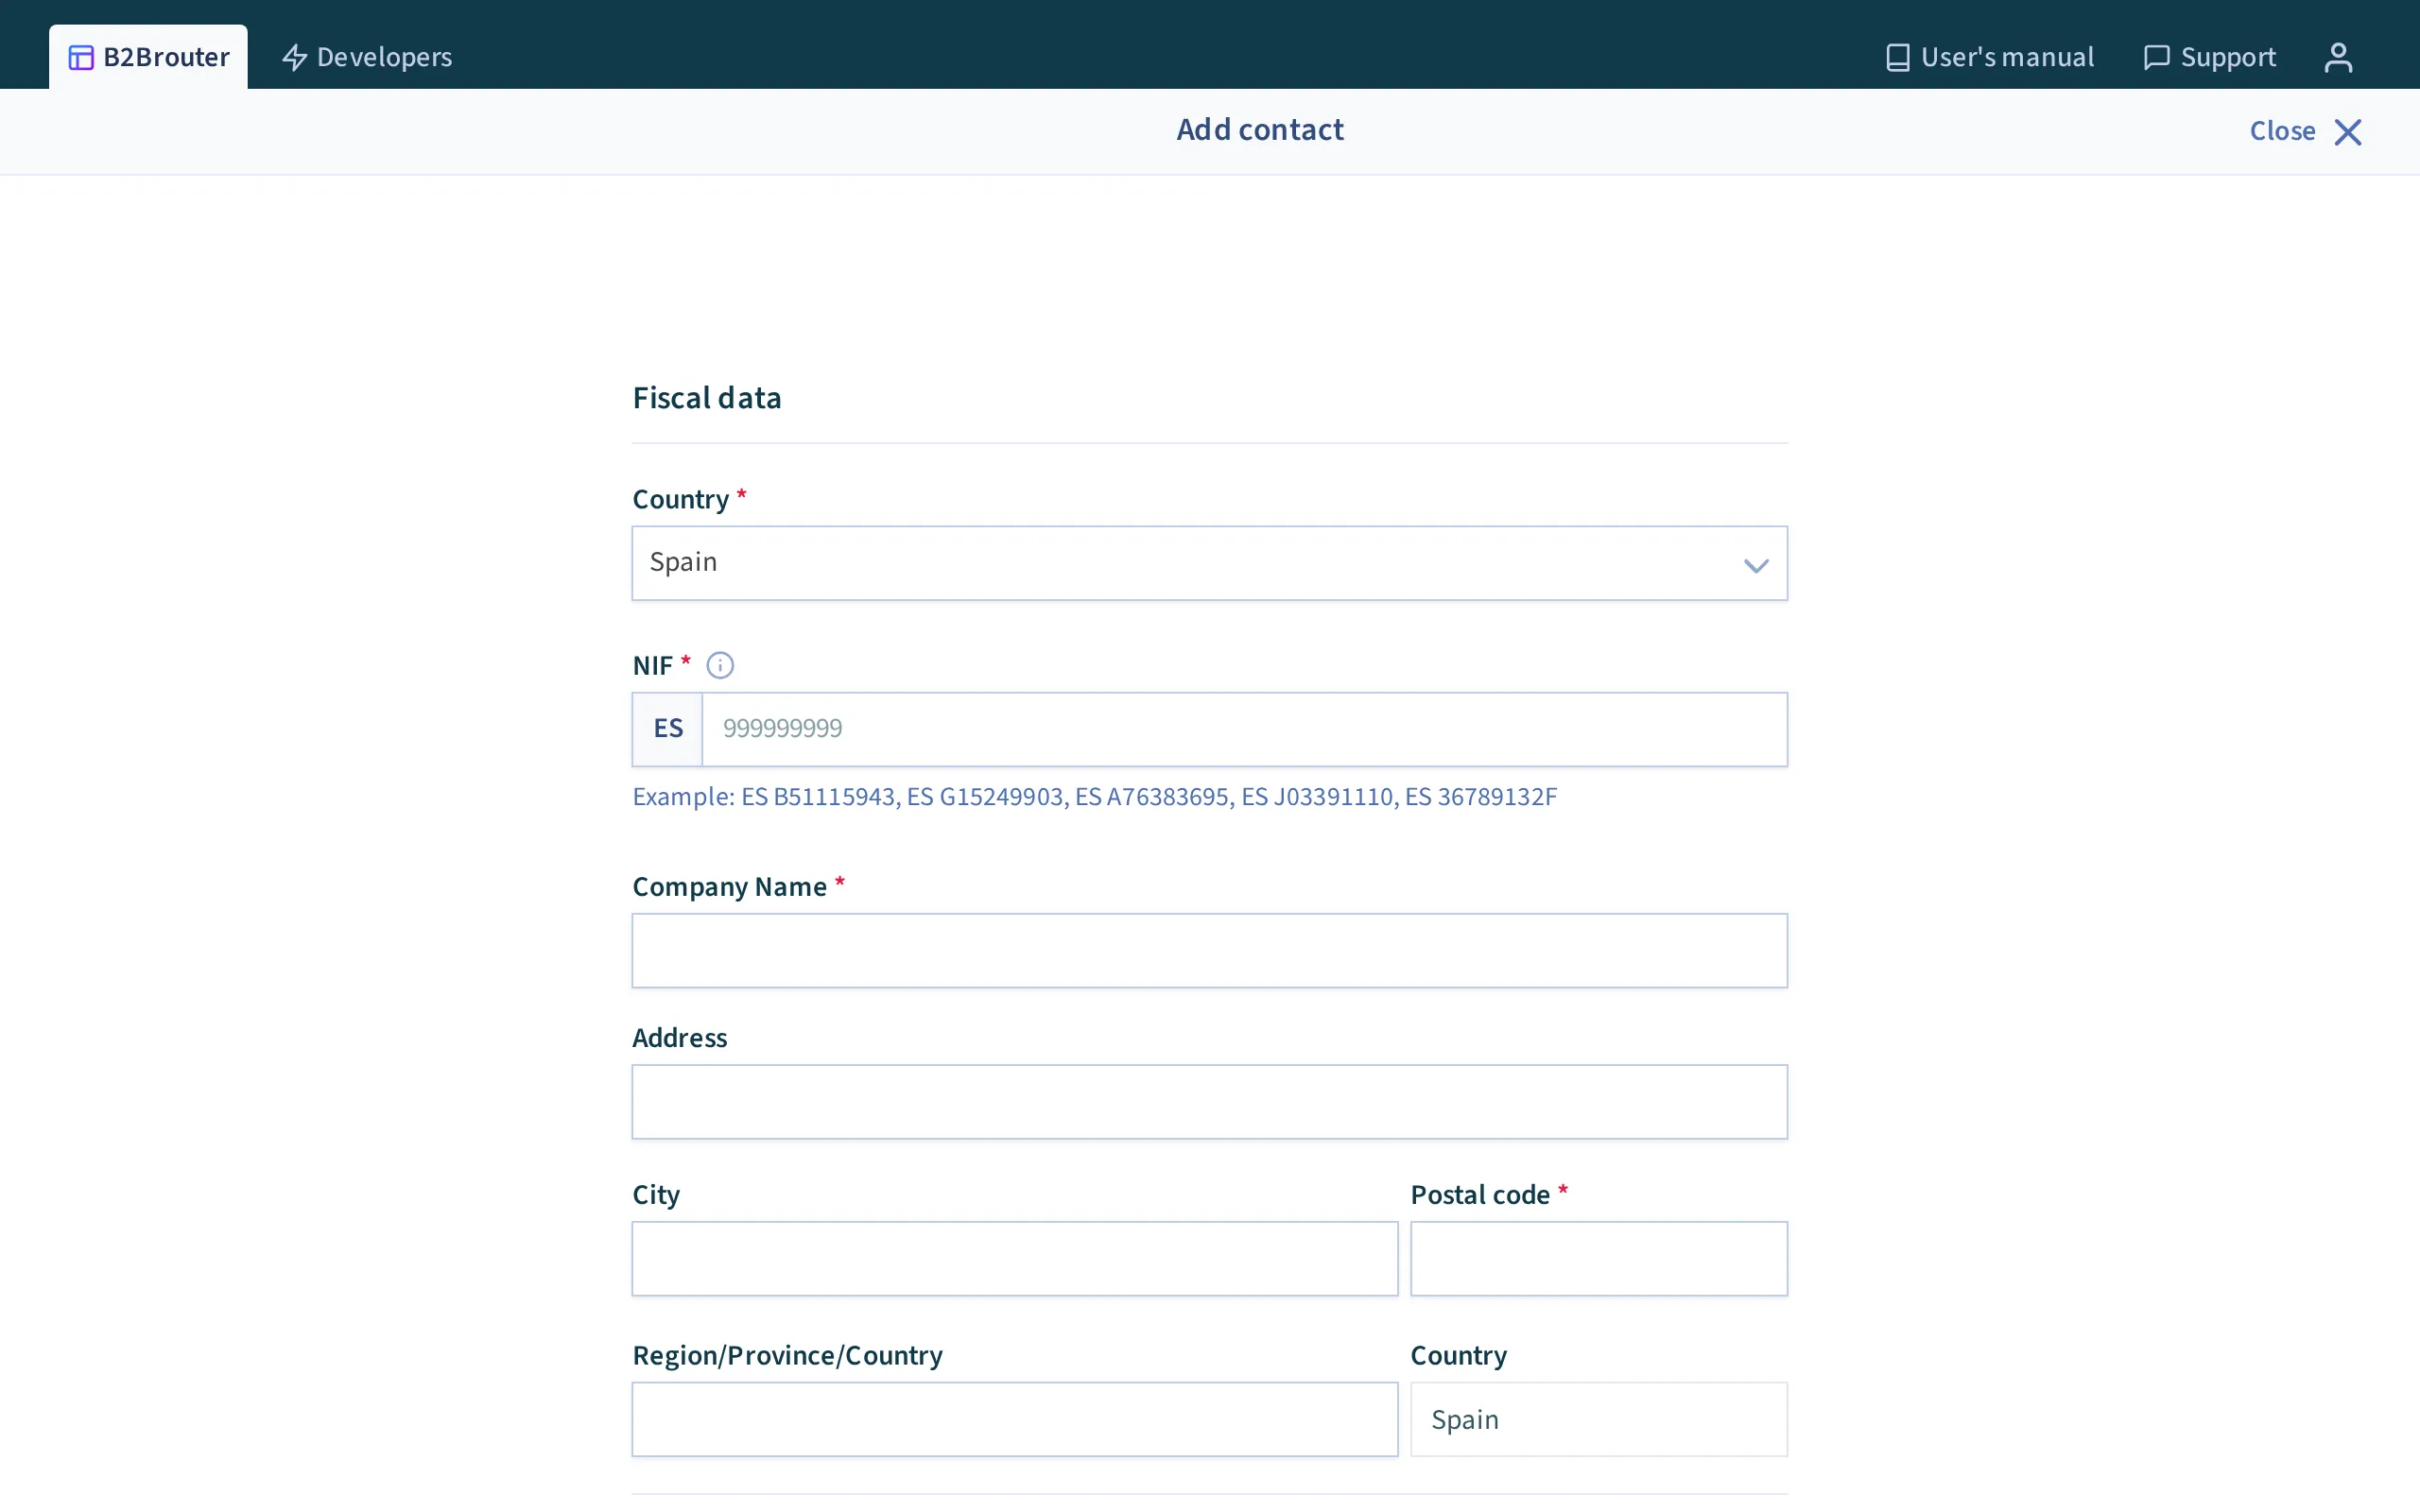
Fiscal data
Section titled “Fiscal data”Add the contact’s tax details. The name and postal code are required.
The postal code format is only checked for Spain, Italy and Saudi Arabia, where it must have five digits. If a correct foreign postal code gives an invalid postal code error, the contact has one of these three countries: check the Country.
Once you have entered the details, click Save.
Contacts in the Netherlands
Section titled “Contacts in the Netherlands”If your company is in the Netherlands and so is the contact, the electronic invoice (Peppol BIS3 or NLCIUS) must carry an organisation identifier of the customer. The btw-nummer (VAT number) does not count as one: the invoice is rejected with a validation error that refers to KVK and OIN.
- Which number: the 8-digit KvK if the customer is a company, or the 20-digit OIN if it is a public body. One of the two is enough.
- Where it goes: in the Organisation ID field of the contact’s fiscal data, with the type 0106 - KVK or 0190 - Organisatie-identificatienummer (OIN). When you create the contact, you can also choose KVK or OIN as the Identifier type in the identification step.
- If the contact comes from the directory and the field is not shown, first customise the contact’s fiscal data (see Verified contacts from the directory).
- Where the number comes from: the customer must provide it, or you can look it up in the Dutch trade register (Handelsregister of the KVK). B2Brouter cannot fill it in automatically.
Invoice sending method
Section titled “Invoice sending method”This section is very important, as this is where you select the method or network used to send invoices to this contact. First, select one of the options according to the type of contact:
E-mail link
Section titled “E-mail link”This option allows you to send an email to the contact with a link to the invoice. The recipient only needs to click the link to access the invoice in B2Brouter, where they can download it.
Attachment by e-mail
Section titled “Attachment by e-mail”This option allows you to send an email to the contact with the invoice attached. It requires a Professional plan or higher: on the basic plan the option appears disabled, with the Premium tag.
Once selected, choose the Format of the file the contact will receive. The list depends on the contact’s country:
- For every country: PDF, PDF (Signed) and Peppol BIS3 Invoice. The last one is the UBL XML of the European standard EN 16931: the name is that of the format, not of the channel, and the contact receives it attached to the email without going through the Peppol network.
- In addition, the formats specific to the contact’s country, tagged with the country name. For example:
- Spain: FacturaE 3.2 and FacturaE 3.2.2.
- France: the PDF/A hybrids that carry the XML inside (Factur-X/ZUGFeRD EN 16931 (PDF/A), Factur-X/ZUGFeRD EXTENDED (PDF/A) and France Factur-X (PDF/A)), the Factur-X XML formats, the French CIUS and Extension profiles in UBL and CII, and Chorus Invoice.
- Germany: the hybrids Factur-X/ZUGFeRD EN 16931 (PDF/A) and Factur-X/ZUGFeRD EXTENDED (PDF/A), ZUGFeRD EXTENDED and XRechnung in UBL and CII.
- Italy: Fattura Elettronica (FatturaPA) and Fattura Elettronica Semplificata.
- Netherlands: Netherlands SI-UBL 2.0 Invoice.
The format only decides the file that is generated; the channel is still email. With an XML format, the PDF is not attached automatically: if you want the contact to receive both files, attach the PDF to the invoice.
Open network (public administrations and Peppol)
Section titled “Open network (public administrations and Peppol)”This option allows you to send electronic invoices to the main open networks to which the public administrations of different countries are adhered, as well as to private companies that, due to the regulations of their country, need to send or receive electronic invoices. Once you have checked this option, you must select where you want to send the invoice through the drop-down menu Open Network:
Europe
ePrior
If you select this option, you must also indicate the customer’s ePrior identifier. Select the type of identifier in the Eprior Scheme ID dropdown and then add the identifier in Eprior Endpoint ID.
Peppol
If you select this option, you must also specify the client’s Peppol identifier. To do this, you must first configure Peppol connection. Under Company Peppol ID select the type of identifier from the drop-down menu and then add the Peppol identifier.
Spain
FACe
It is the General Entry Point of the Ministry where practically all the public administrations of the country are adhered.
FACe detached
It is the same as the previous one but, in the case of sending files attached to the invoice, they are sent separately.
FACeB2B
This is the General Entry Point that allows private Spanish companies to exchange electronic invoices. Currently only government contractors and subcontractors are required to use it.
FACeB2B detached
It is the same as the previous one but, in the case of sending attached files to the invoice, they are sent separately.
eFACT Catalonia
It is the General Entry Point where practically all the public administrations of Catalonia are adhered.
Junta de Andalucía
It is the General Entry Point where the administrations related to the Junta de Andalucía (not visible) are adhered.
Junta de Castilla - La Mancha (PeCAM)
It is the General Entry Point where the administrations related to the Junta de Castilla - La Mancha are adhered. To send to this General Entry Point it is necessary to configure the connection first.
Junta de Galicia
This is the General Entry Point where the administrations related to the Junta de Galicia (not visible) are adhered. To send to this General Entry Point it is necessary to configure the connection first.
Government of the Canary Islands (PeFAC)
It is the General Entry Point where the administrations related to the Government of the Canary Islands are adhered.
Eusko Jauralitza (Basque Government)
It is the General Entry Point where some of the administrations related to the Basque Government are adhered. To send to this General Entry Point it is necessary to configure the connection first.
Osakidetza (Basque Health Department)
This is the General Entry Point where the administrations of the Basque Health Department are attached. To send to this General Entry Point it is necessary to configure the connection first.
Diputación de Álava
This is the General Entry Point where the administrations related to the Diputación de Álava are attached (not visible).
Diputación de Vizcaya
It is the General Entry Point where the administrations related to the Diputación de Vizcaya are adhered (not visible).
Water Consortium of Bilbao Vizcaya
It is the General Entry Point of the Water Consortium of Bilbao Vizcaya.
eEfaktur
It is the General Entry Point where some administrations of the autonomous community of the Basque Country are adhered.
France
Chorus
It is the platform where you have to send electronic invoices to invoice the French public administration. To be able to do this, you first need to register on the Chorus Pro portal.
If you select Chorus Pro as the sending method, at the bottom of the Open Network drop-down, the Service code box is activated, where the customer’s service code must be added in order to be able to send the invoice correctly.
Italy
SDI
This is the platform through which electronic invoices are sent for invoicing in public and private companies in Italy.
If SDI is selected as the sending method, several options are activated at the bottom of the Open Network drop-down menu:
- Activate the Is a Public Administration option if the customer is a public administration.
- In the VAT collection dropdown, select the desired option.
- In the Addressee Code option, add the customer’s addressee code.
Portugal
FE-AP Saphety / FE-AP / efacturaGov
These are the platforms through which electronic invoices are sent to the Portuguese public administration.
Cyprus
Ariadne
It is the platform through which electronic invoices are sent to the public administration of Cyprus.
Andorra
Government of Andorra
It is the platform through which electronic invoices are sent to the Government of Andorra.
In order to send an electronic invoice to the Government of Andorra, you must have processed and registered your digital certificate with the client.
United Kingdom
Peppol NHS
It is the network that allows the exchange of electronic documents between the English health service and its providers. To do this, you first need to configure the Peppol connection.
If you select Peppol NHS as sending method, at the bottom of the Open Network drop-down, the Peppol Company ID options are activated, where you need to add the customer’s Peppol identifier.
Germany
Peppol XRechnung / Peppol ZuGFeRD
If you select either of the two formats as shipping method, at the bottom of the Open Network drop-down the Peppol Company ID options are activated, where the customer’s Peppol identifier has to be added.
Netherlands
Peppol NLS CIUS
This is the e-invoice format used in the Netherlands.
If you select this option as the shipping method, the Peppol Company ID options are activated at the bottom of the Open Network dropdown, where the customer’s Peppol ID must be added.
Australia / New Zealand
Peppol AU-NZ
This is the e-invoice format used for invoicing in the Australian and New Zealand public administration.
If you select this option as sending method, at the bottom of the Open Network dropdown, the Peppol Company ID options are activated, where you have to add the customer’s Peppol identifier.
Singapore
Peppol SG
This is the network through which electronic invoices are sent to Singapore.
2. Create your customers or suppliers automatically
Section titled “2. Create your customers or suppliers automatically”You can upload a CSV file with the data of your customers and, in this way, they are automatically created with the information contained in the imported file. From the Contacts section, use the Import file option:
- From the Download CSV file example link you can download an example of the file you need to import to create your customers automatically.
- Use the example to create the file with your customer data.
- Use the Add file option to find the file in your system and upload it to B2Brouter.
- Finally, use the Import option.
If the file is correct, your customers will be created automatically in B2Brouter.
If a row does not give the contact’s country, the contact takes your account’s country. The same happens with contacts you create through the API or that arrive inside an imported invoice. Always give the country of each contact.
3. Editing a contact
Section titled “3. Editing a contact”How to access editing
Section titled “How to access editing”To edit a contact, go to the contacts list and click the row of the contact you want to edit. Once on the contact record, you’ll find the contact’s information grouped into cards. Each card has an Edit link that opens the form directly at the relevant block. You can also access the contact’s editing sections from the side menu.
Available editing blocks
Section titled “Available editing blocks”Fiscal data
Section titled “Fiscal data”This is the main block, and the one that opens by default. Here you can define:
- Contact type: customer, supplier, or both at once.
- Fiscal identifiers: tax ID and other identifiers depending on the country.
- Name or company name and full address: address, number, postcode, city, province or district, and country. The fields shown adapt to the contact’s country.
- Currency in which the documents will be issued.
- Buyer number, if your customer requires it on invoices.
If you mark a contact as a customer and it doesn’t yet have a sending method configured, the form will warn you and offer a direct link to set it up.
Contact data
Section titled “Contact data”Information about the person and the communication channel: the contact person’s first and last name, department, email address, phone number, language, and website.
The language determines the language in which they’ll receive the communications and documents you send them; the email address is what will be used to send them invoices when the channel requires it.
Collection
Section titled “Collection”Payment terms that will apply by default to this customer’s invoices: collection method, your own bank account where you want to receive payment, the customer’s IBAN in case of direct debit, explanatory payment text, due dates, and payment reminders.
Note: for some recipients, this configuration is fixed by the recipient. In these cases, the block appears locked with an explanatory notice.
Bank account
Section titled “Bank account”The contact’s IBAN and BIC. This is the contact’s own bank details, mainly used when they act as a supplier.
Invoice sending method
Section titled “Invoice sending method”Defines the channel through which invoices will reach this contact. You can choose between:
- Email: the customer receives an email with the invoice attached.
- B2Brouter: the customer receives an email with a link to view and download the invoice.
- Peppol network: B2Brouter delivers the invoice to the customer’s Peppol access point and sends them no email. If the customer receives a notice, their own platform sends it.
- Open Network: sending to public administrations through standardised networks.
- None: only available for contacts that are not customers.
Each contact has a single sending method: you can’t send them the same invoice by Peppol and by email at the same time.
Notices about your own sends (issued invoices, refused invoices and sending errors) go to the addresses you set in Email notifications.
Once you’ve chosen the category, the form asks you to specify the channel and the document format. Some categories are only available on Premium plans; on basic plans they appear checked but disabled.
If the contact is sent invoices via Peppol, the record also shows their participant identifier and whether they’re registered to receive the type of document you want to send them, with an option to check this again.
Integration method
Section titled “Integration method”Only available on Enterprise plans. Lets you save the internal code this customer has in your management system, so B2Brouter can automatically assign it to documents that arrive from your integration.
Verified contacts from the directory
Section titled “Verified contacts from the directory”When a contact comes from our directory of verified companies, the fiscal data and sending method are shown in read-only mode and can’t be edited directly. You have two options:
- Request a change: if you think the directory information is incorrect or outdated, you can open a request from the same screen.
- Customise the data: the block’s edit option unlocks the fields so you can adapt them to your case. Doing so means this contact stops receiving automatic updates from the directory. You can always go back with the Reset directory data option.
Saving changes
Section titled “Saving changes”Each block is saved independently with the save button. If you switch blocks without saving, unsaved changes are lost. When required information is missing to be able to invoice, the contact record will indicate this with a notice at the top.