

Set up your account
General data
Section titled “General data”Once you have registered and logged in to your account, you will see a screen where you have to add your company’s tax details:
- In the Country dropdown, select your company’s country.
- In the NIF box, enter your company’s NIF.
- Finally, use the option Validate identifier and continue.
Next, you access step 2 Fiscal data, where you can add your company’s fiscal data (name, address, postcode, etc). Once you have filled in the details, use the Next option.
Finally, go to step 3 Contact person, where you must add the details of a contact person in your company. Finally, use the Save option.
As a result, your B2Brouter account is created and the main menu is activated. Go back to your company settings using the gear icon at the top of the screen and select Account Settings:
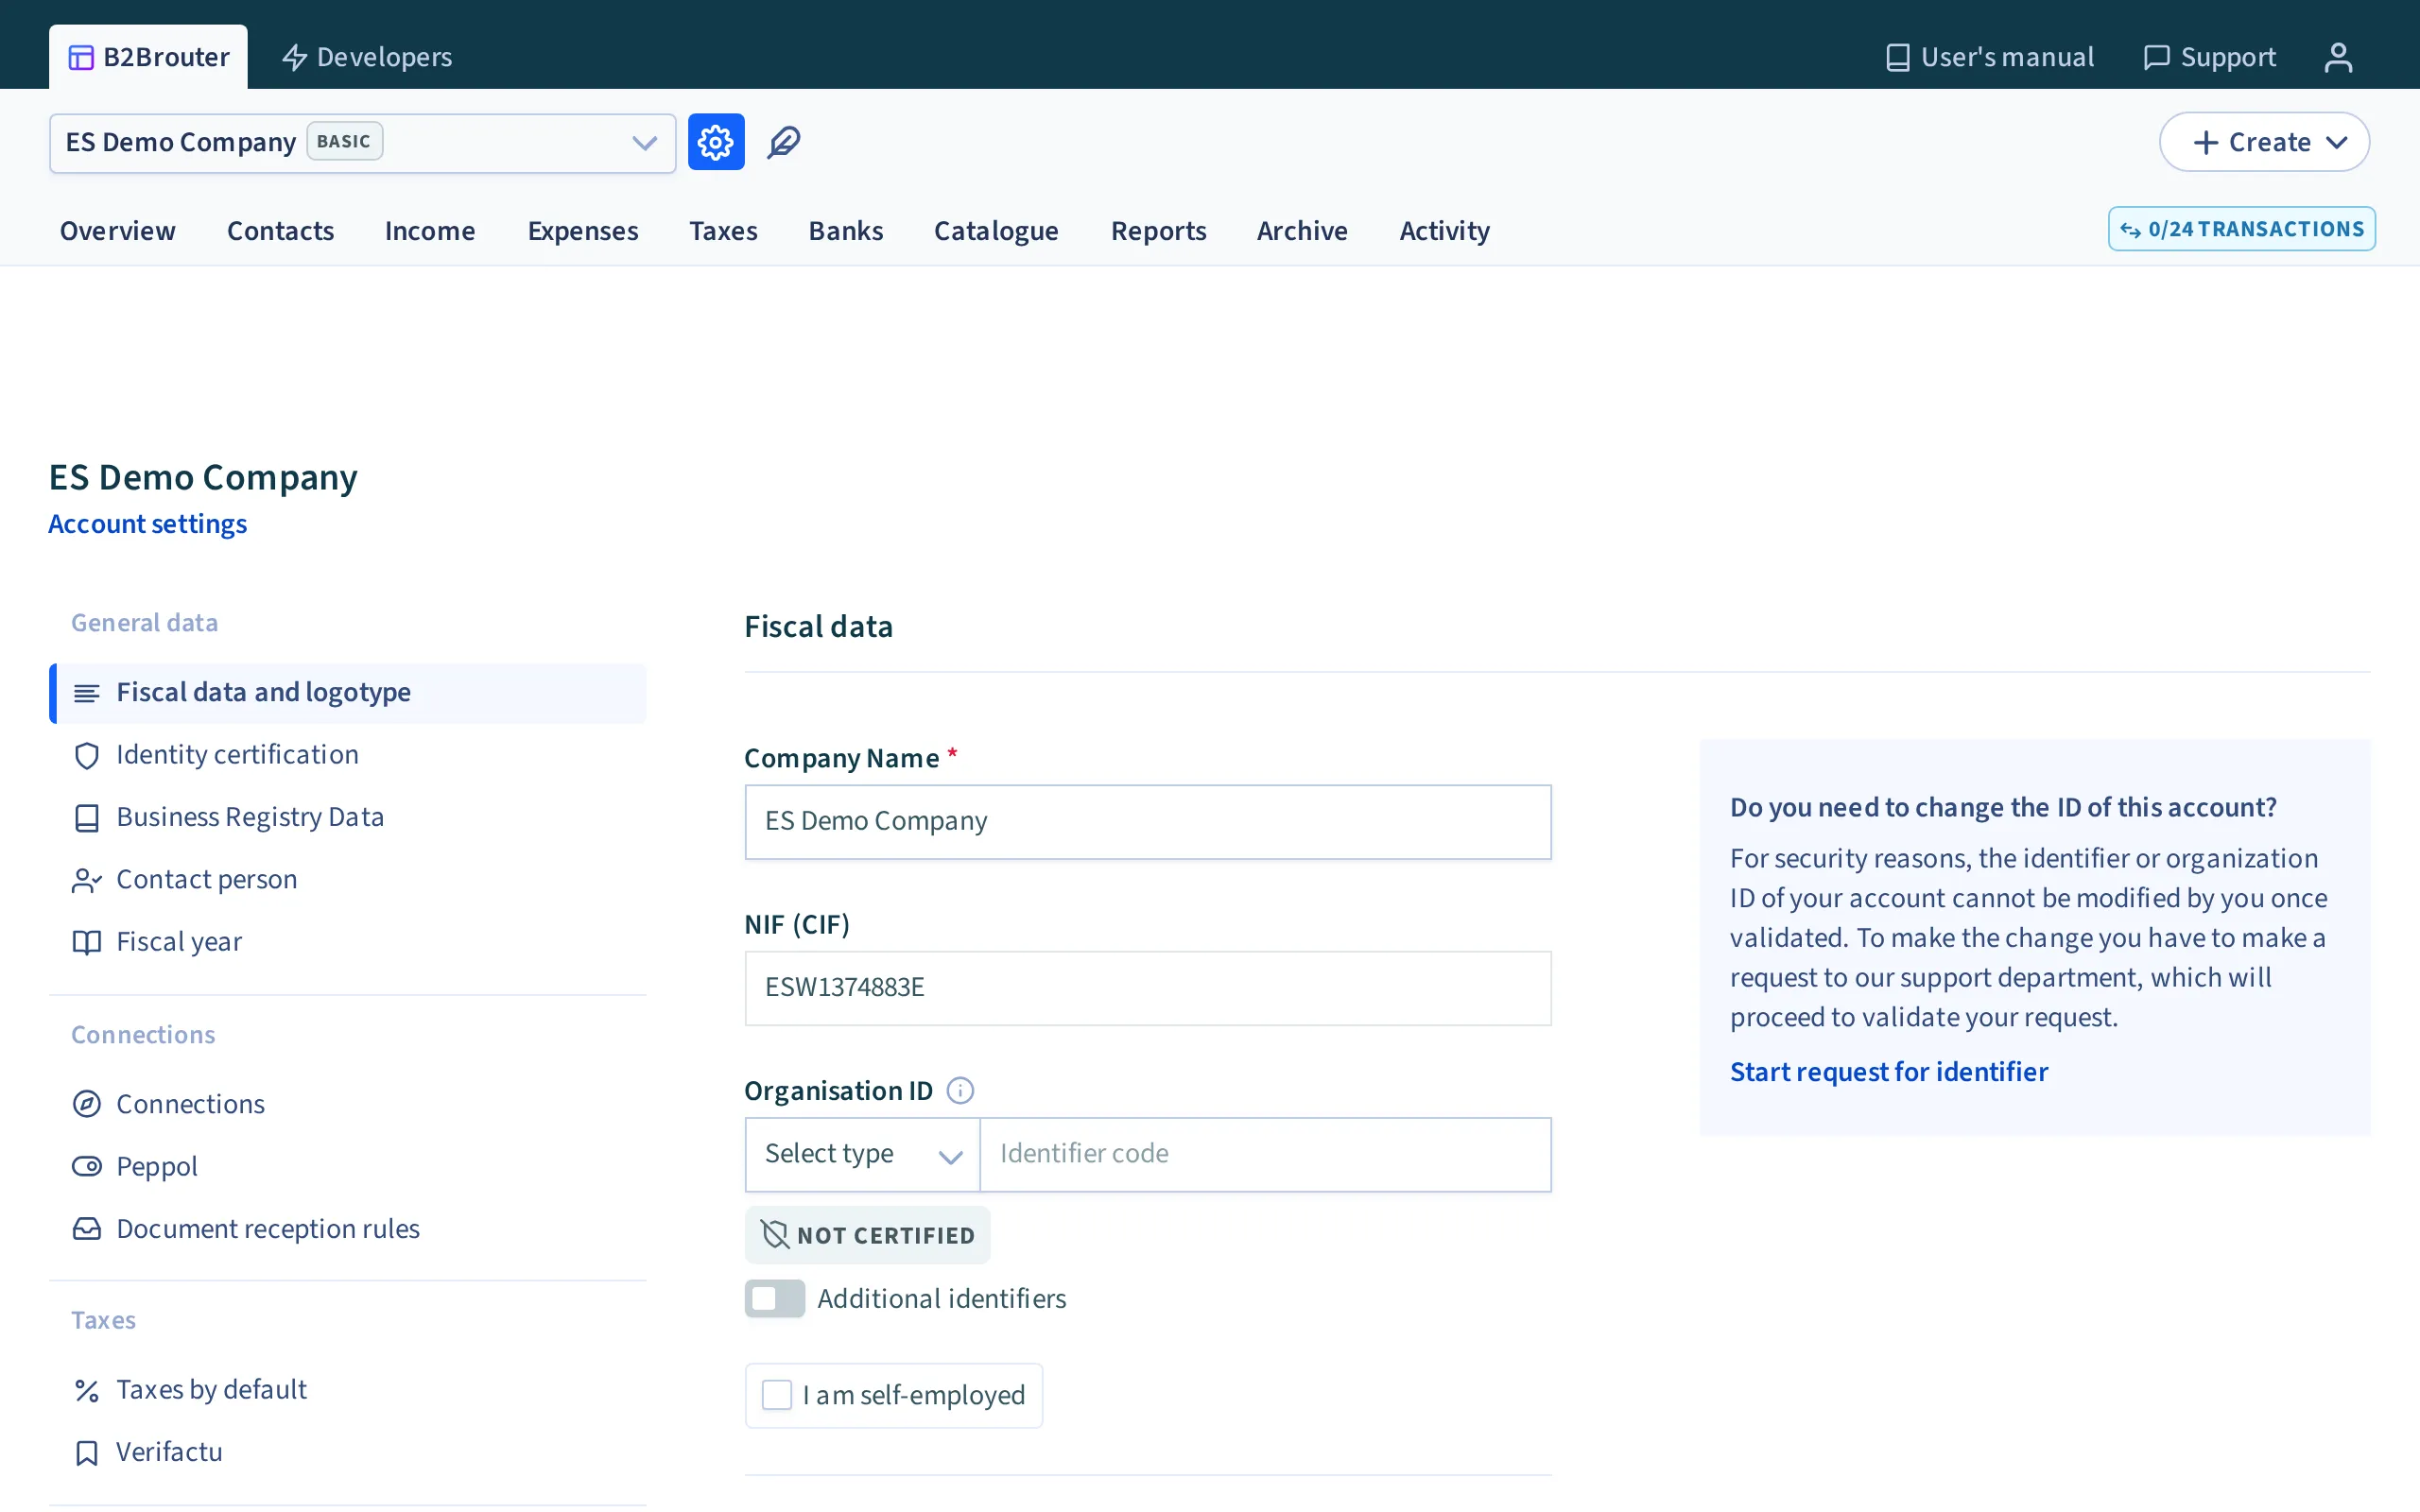
On the left hand side, you find a submenu with the different sections that allow you to configure other aspects of your account.
Fiscal data and logotype
Section titled “Fiscal data and logotype”From this section, you can add or modify your company’s fiscal data and logo.
The logo must be a PNG, GIF or JPEG image. It is shown in the header of the invoices and quotes you issue, and it is the only image of your own that the PDF accepts. See «What you can customise in the PDF template» in the Settings section.
Companies in the Netherlands
Section titled “Companies in the Netherlands”If your company is in the Netherlands, the electronic invoice (Peppol BIS3 or NLCIUS) must carry an organisation identifier of your company. The btw-nummer (VAT number) does not count as one: the invoice is not sent, and the error refers to KVK and OIN on the account’s Organisation ID.
- Which number: the 8-digit KvK or, if you are a public body, the 20-digit OIN. One of the two is enough.
- Where it goes: in the Organisation ID field of the fiscal data, with the type 0106 - KVK or 0190 - Organisatie-identificatienummer (OIN).
- If the field already holds another value and you cannot change it, open a support request with the KvK or OIN number.
- The company’s address, city and postal code are also required on these invoices.
Identity certification
Section titled “Identity certification”In order to issue an electronic invoice from B2Brouter you have to verify your identity using your company’s digital certificate.
Check here how you can Verify your identity.
Business registry data
Section titled “Business registry data”From this section you can add your company’s commercial register data. B2Brouter only stores this data: it does not register your company and it sends nothing to any register.
- The Book, Sheet, Folio, Section and Volume fields only appear when the country of the account is Spain.
- The other fields (location of registration, additional data, inscription, date of inscription and social capital) appear for all countries.
The data appears on the invoice PDF and on the electronic invoice: as the issuer’s legal form in Peppol BIS 3 and Factur-X, in the registration block of Facturae and in FatturaPA. The social capital is only sent in FatturaPA.
Contact person
Section titled “Contact person”From this section you can manage the details of the contact person for your account.
The email, phone and website in this section are the ones that appear in your company block on invoices and quotes. The email is also the reply-to address of the emails you send invoices with.
- This email is not the login email of your user. If you change your login email, your invoices do not change.
- Invoices you create on the web show the email from this section. An invoice that carries its own email, or that was imported or arrived by API with its own email, keeps it. In that case, change it on the invoice or in the source system.
- The name that appears as the issuer is the company name in Fiscal data and logotype. There is no field to change it on each invoice.
- If you do not want the email on the PDF, use the Hide email option (see «Hide elements from view», in the Settings section).
Fiscal year
Section titled “Fiscal year”From this section you can select the start date of the fiscal year.
The fiscal year is the period in which taxes are reported. In case you need to change the start month of your fiscal year, you can select a month that does not coincide with the calendar year.
- In the Start month of tax year field, enter the starting month of your tax period.
- Use the Save button to save your changes.
Invoices dated within a closed fiscal year cannot be sent.
You can access, view, edit and delete them from the Income section.
Connections
Section titled “Connections”Connections
Section titled “Connections”From this section you can configure the different connections you wish to use to send or receive electronic documents.
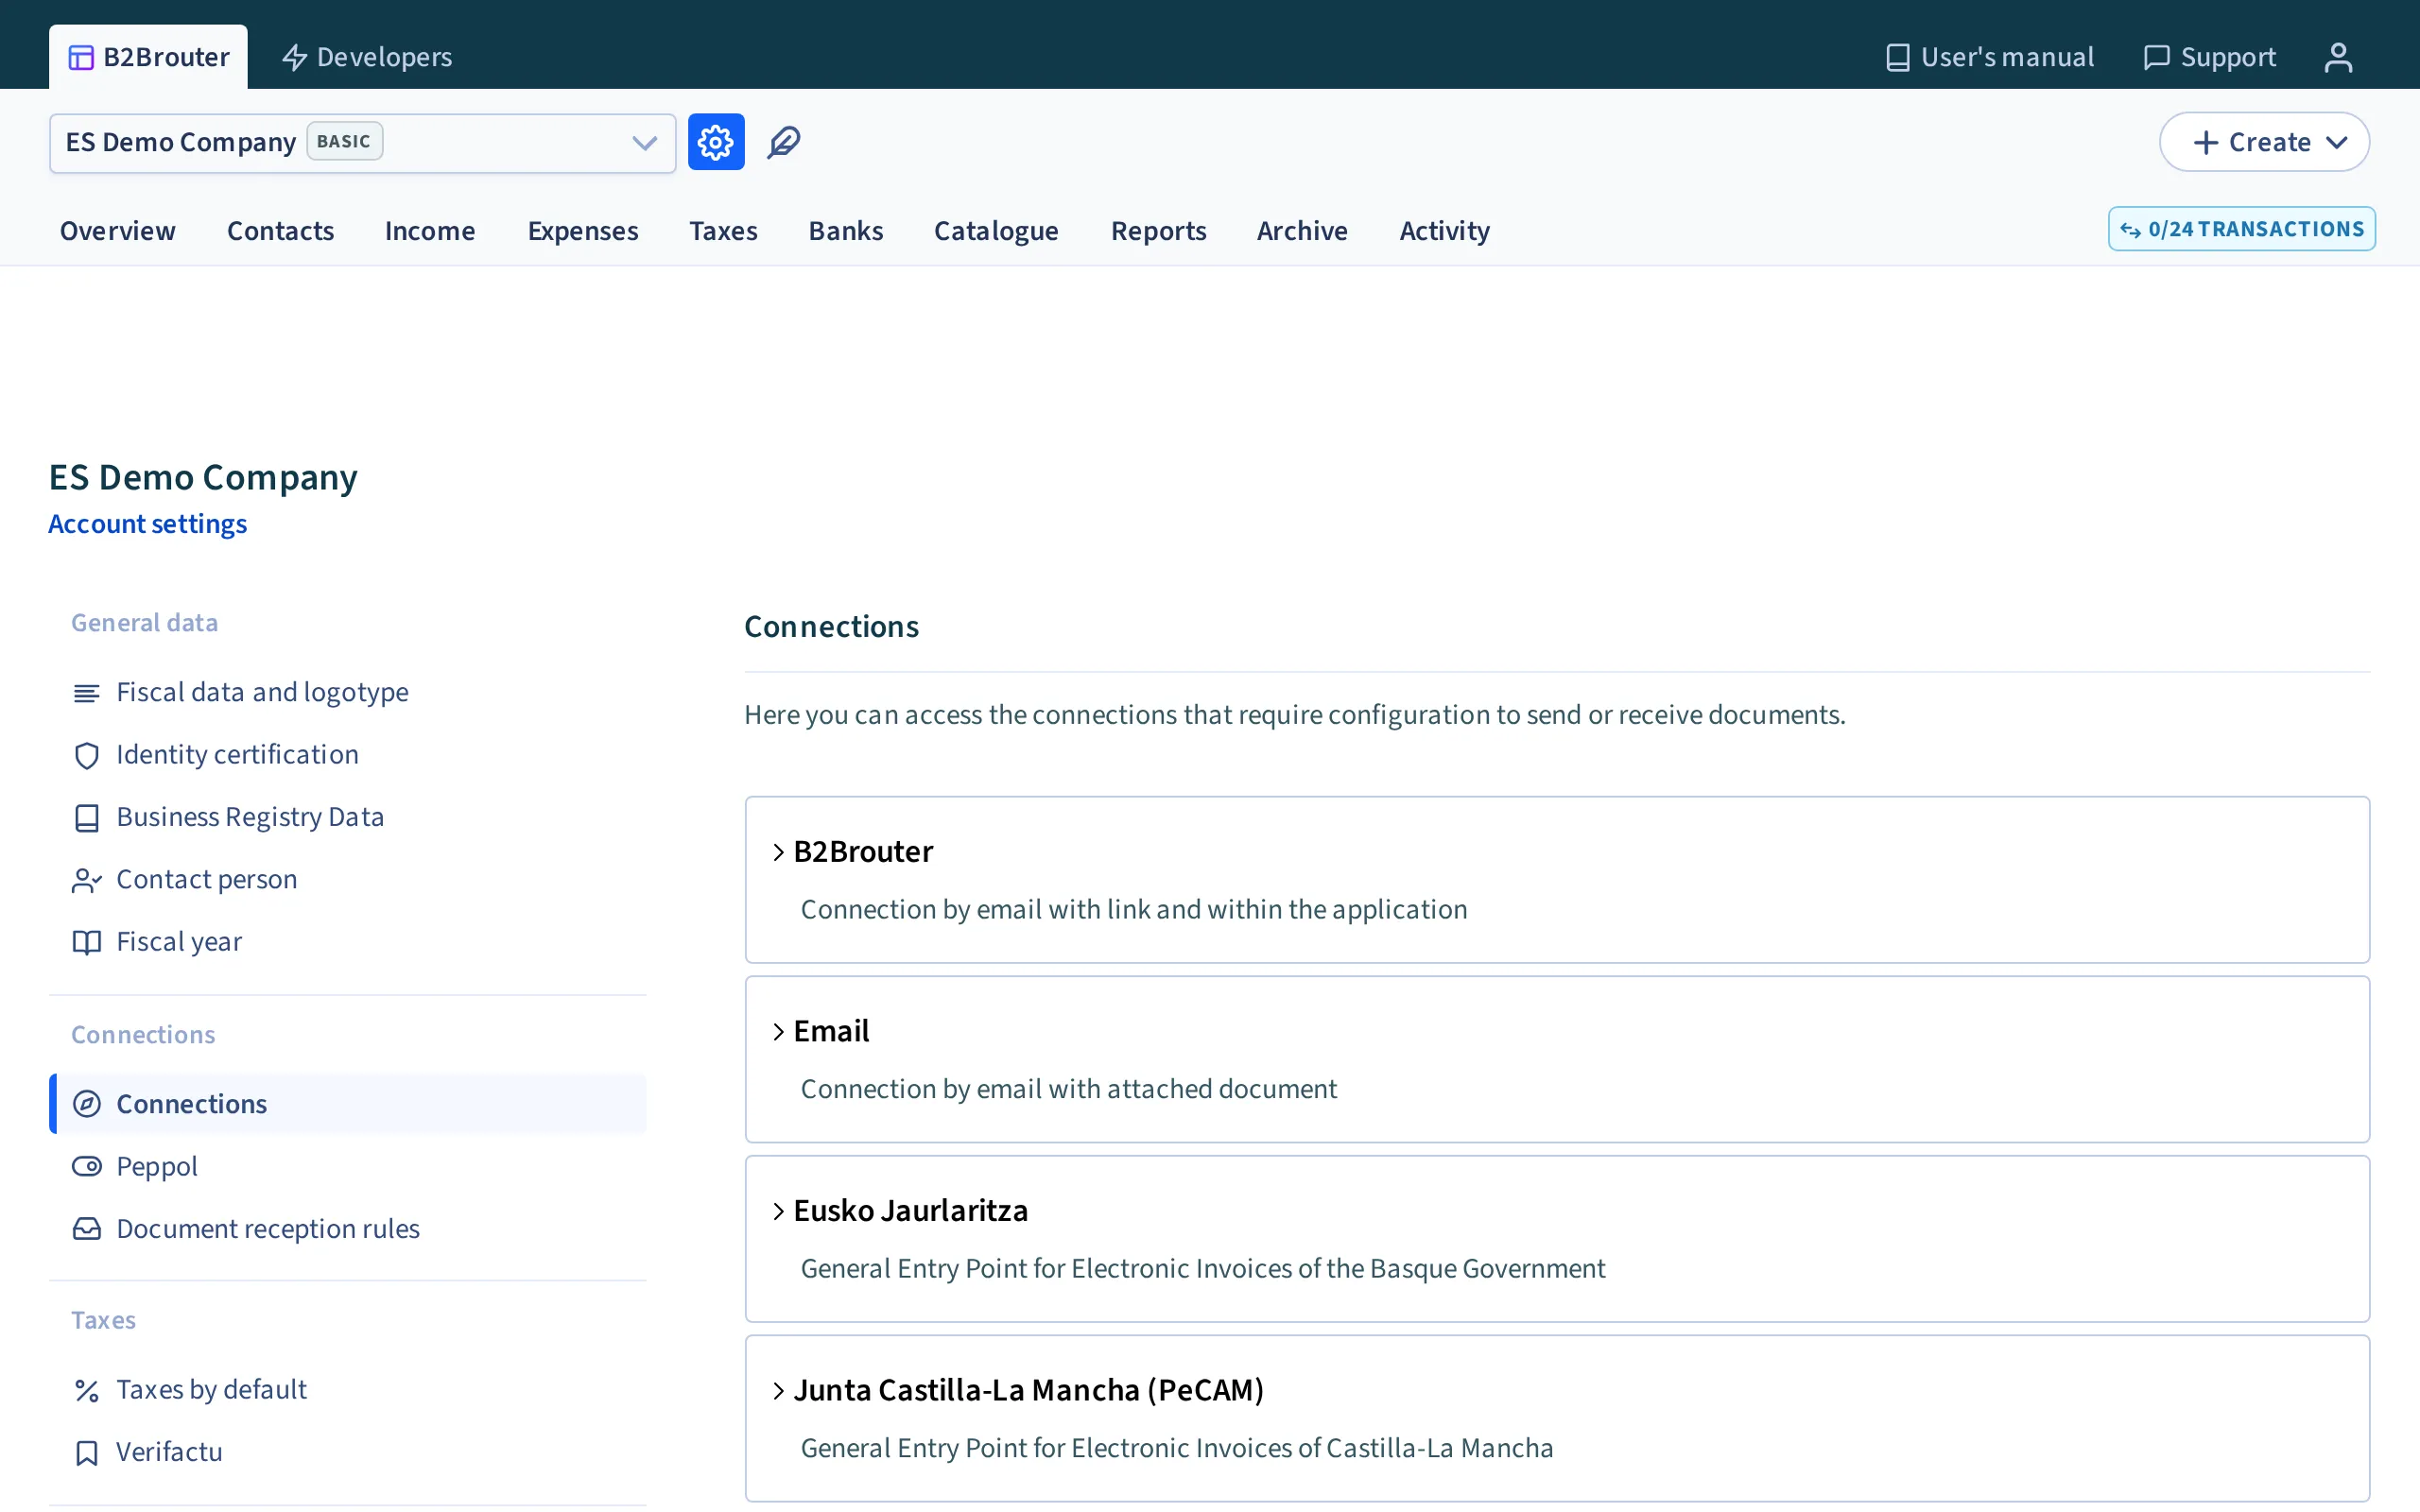
- B2Brouter: Configure the email connection with link inside the application. If you activate this option and your suppliers also have a B2Brouter account, you will receive invoices directly in the portal.
- Email: Configure your outgoing email server. As a result, the invoices you send via email are sent from your company’s email server instead of the @b2brouter server. You can also set up to receive invoices to B2Brouter via email.
Configure the Email connection:
Section titled “Configure the Email connection:”Click on the New connection option under the Email icon so you can configure these two options:
Receipt of invoices in B2Brouter via email: Check the Email box.
- Select the box Email.
- In the text below, you find your B2Brouter email address where your suppliers have to send you invoices.
- This email is: EN “YourTAXID”@b2brouter.email.
Sending invoices from B2Brouter using your company’s mail server:
- Activate the option Customise SMTP server.
- Fill in the form with the requested information of your server data.
Once the configuration is complete, use the Save button on the bottom right.
- General Points of Entry - Spain: Configure the connection to those Spanish General Points of Entry that require it.
- Edicom network: Configure the Edicom connection for the issuance of electronic documents using this network.
- Ediversa network: Configures the Ediversa connection for the issuance of electronic documents using this network.
- SDI (System Switching Interchange) connection - Italy: Configure the SDI connection if your company is Italian and you need to send or receive electronic documents.
Peppol
Section titled “Peppol”Activation of Peppol
Section titled “Activation of Peppol”The Peppol network is an international network that allows you to exchange electronic documents (invoices, self-invoices, orders and invoice status changes) securely between companies worldwide. Before you can send or receive documents through Peppol from B2Brouter, you need to activate Peppol.
Important Peppol activation is an identity verification process designed to ensure network security and prevent illegal activities. This process only needs to be done once.
Prerequisites
Section titled “Prerequisites”Before starting the activation, make sure you have the following at hand:
- An official document proving your company’s identity (for example, articles of incorporation, VAT number, or equivalent document depending on the country).
- Access to your account settings in B2Brouter.
Steps to activate Peppol
Section titled “Steps to activate Peppol”- Go to Account Settings using the gear icon
 at the top of the screen.
 - In the left-hand menu, select Peppol.
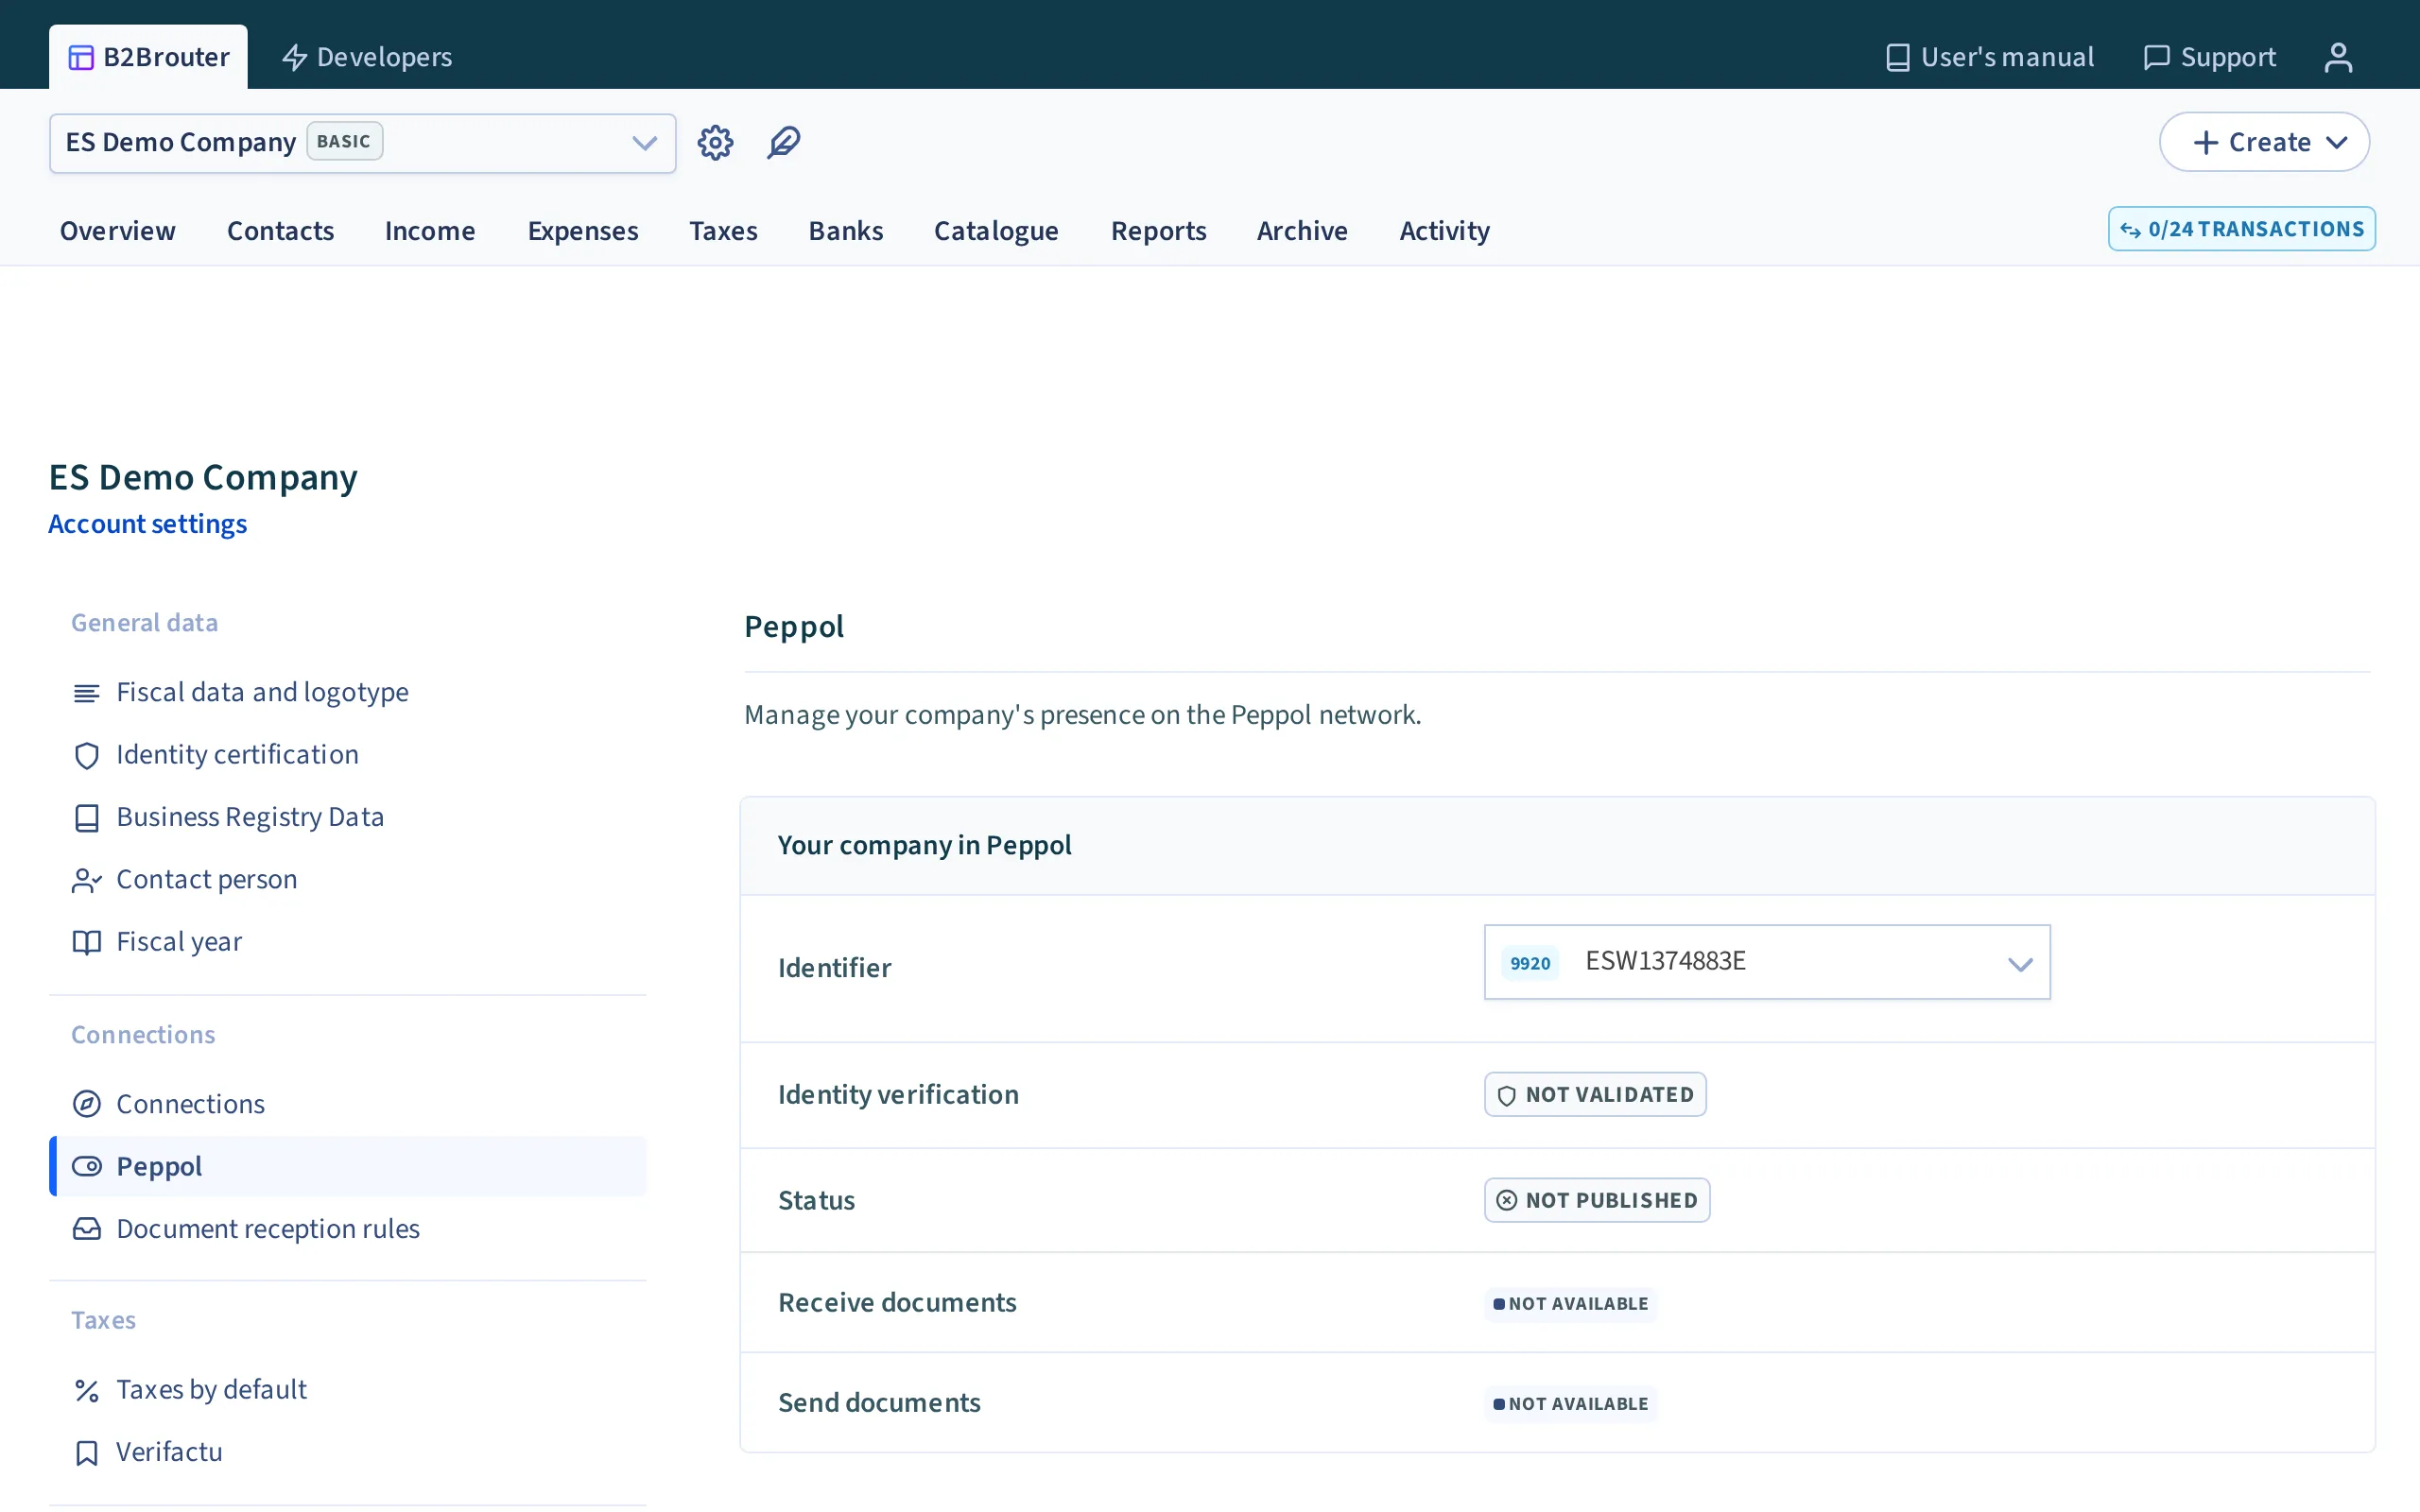
- Select the identifier you wish to use. Here you can check the status of the identity validation associated with this identifier, its status on the Peppol network and its reception and sending capabilities.
- Click Validate identity and activate Peppol to start the process.
- Attach the document proving your company’s identity using the Select files button.
- Enable reception if you wish with the Activate Peppol reception box and select at least one document type. If you select none, reception stays disabled and your identifier is not published on the Peppol network.
- Read the Peppol service agreement and, once reviewed, check the acceptance box.
- Click Send validation and activate Peppol to complete the process.
Migrating from another provider to B2Brouter
Section titled “Migrating from another provider to B2Brouter”If your identifier is registered with another Peppol provider, after clicking “Send validation and activate Peppol”, you will see the option to migrate or not to B2Brouter.
The migration options are as follows:
- Migration code: Enter the migration code provided by your current provider. This is the recommended option to avoid losing capabilities during the migration period.
- Continue without code: Ask your provider to unpublish your company from Peppol. Once unpublished, when you access the Peppol page, you will see the updated data. Likewise, if you have obtained the migration code, you will have the option to enter it.
Option not to migrate You have the option of not migrating to B2Brouter and keeping the current management with your provider, using B2Brouter only to send documents (unless you configure the SMP of your current provider). If you choose this option, you can migrate later if you wish.
After sending the validation
Section titled “After sending the validation”Once the request has been submitted, the B2Brouter support team will review the documentation. In the meantime, you can start using Peppol to send invoices.
To set up your customers’ Peppol identifier or find out how routing works, see What is the Peppol identifier.
What happens if the validation is rejected If the validation is rejected, the Peppol transport will no longer be available in your account. You will receive a notification from the support team with instructions on how to complete the validation again.
Document reception and formats
Section titled “Document reception and formats”When your company is published on the Peppol network with reception capabilities, you will be able to see the formats you accept in the blue box on the side panel. Formats are set by default according to the country of your identifier and the type of document you have selected. To disable reception, uncheck all document type boxes. To enable it, tick at least one box under Receive documents: the status changes to Enabled and your identifier is published on the Peppol network.
Other options
Section titled “Other options”In the More options dropdown you can find detailed information about the status of your identifier on the Peppol network:
- Service provider: Name and email address of the Peppol access provider assigned to your account. This is the entity responsible for managing your connection to the network.
- SML status: The SML (Service Metadata Locator) is the central directory of the Peppol network that allows your company to be located. If it is published, your identifier is findable on the network and documents can be correctly routed to you.
- SMP status: The SMP (Service Metadata Publisher) contains information about the types of documents you can receive and how. If it is published, your reception capabilities are visible to other network participants.
- Peppol Directory status: Indicates whether your company is published in the Peppol Directory, the public catalogue where businesses can find you as a Peppol-connected provider.
Publication follows reception. B2Brouter only publishes your identifier to the SML, the SMP and the Peppol Directory when reception is enabled. If no document type is ticked under Receive documents, its status is Disabled, your identifier is not published and your company does not appear in the Peppol Directory: the SML, SMP and Peppol Directory rows stay at Not published.
These rows say nothing about the identity validation. The two are independent: an identifier can be Published while Identity verification is still Reviewing, and it can be Validated with the status Not published because reception is off. To get published, enable reception by ticking at least one document type under Receive documents (see Document reception and formats). Sending documents through Peppol does not depend on this publication.
Peppol Directory
Section titled “Peppol Directory”The Peppol Directory is a public catalogue where companies can search for and find providers connected to the Peppol network. Being published makes it easier for your current and potential customers to identify you as a company ready for electronic invoicing.
If needed, you can unpublish your company from the Peppol Directory using the Unpublish from Peppol Directory option. Keep in mind that by unpublishing:
- You will remain connected to the Peppol network and will be able to continue sending and receiving invoices.
- Your company will not appear in public directory searches.
- Your customers will need to know your Peppol identifier to send you invoices.
Tip: We recommend not unpublishing from the directory unless necessary. If you do, you can republish at any time.
Unpublish and migration code
Section titled “Unpublish and migration code”Next to the main status you will find a three-dot menu ⋮ with additional actions:
- Unpublish: Unpublishes your company from the SMP, which is equivalent to disabling document reception through Peppol. Your company will no longer be findable on the network and you will not be able to receive invoices or other documents until you reactivate reception.
- Request migration code: Generates a code you can use to migrate your Peppol identifier to another access provider. Use this option only if you plan to change your Peppol provider. Once the migration code has been requested, the service will continue to operate normally until you complete the process by entering the code at the new provider or cancelling the migration from B2Brouter.
Document reception rules
Section titled “Document reception rules”From this section you can configure the rules that apply to the reception of electronic documents in your account.
These options do not activate reception. To receive invoices, what counts is the channel (for example, Peppol or your B2Brouter email address). All options are off by default: with no option ticked, invoices arrive and wait for you to accept or reject them.
- Automatically reject invalid documents: Received invoices with validation errors will automatically change to “Rejected” status.
- Automatically accept valid documents: Received invoices without validation errors will automatically change to “Accepted” status.
- Reject documents from unknown senders: Documents received from senders not listed as one of your suppliers in the Contacts section get a validation error. They are only rejected if the Automatically reject invalid documents option is also on. This option does not apply to documents you upload yourself (file upload, SFTP or import).
- Require signature on invoices received in FacturaE format: for Spanish accounts only.
- Require delivery note number and item code on all invoice lines
- Automatically recognise text: Automatically recognise the text of received invoices.
- Automatically reject based on document format (marked as Deprecated): only appears on accounts that already have a saved format restriction. A document in a format that is not accepted gets a validation error, and it is only rejected if the Automatically reject invalid documents option is also on. If a supplier’s invoice becomes invalid for this reason, add the format to the list or remove the restriction. There is no need to ask the supplier to send it again.
The invoice reception rule is available on all plans. The order reception rule requires the Business plan.
Taxes by default
Section titled “Taxes by default”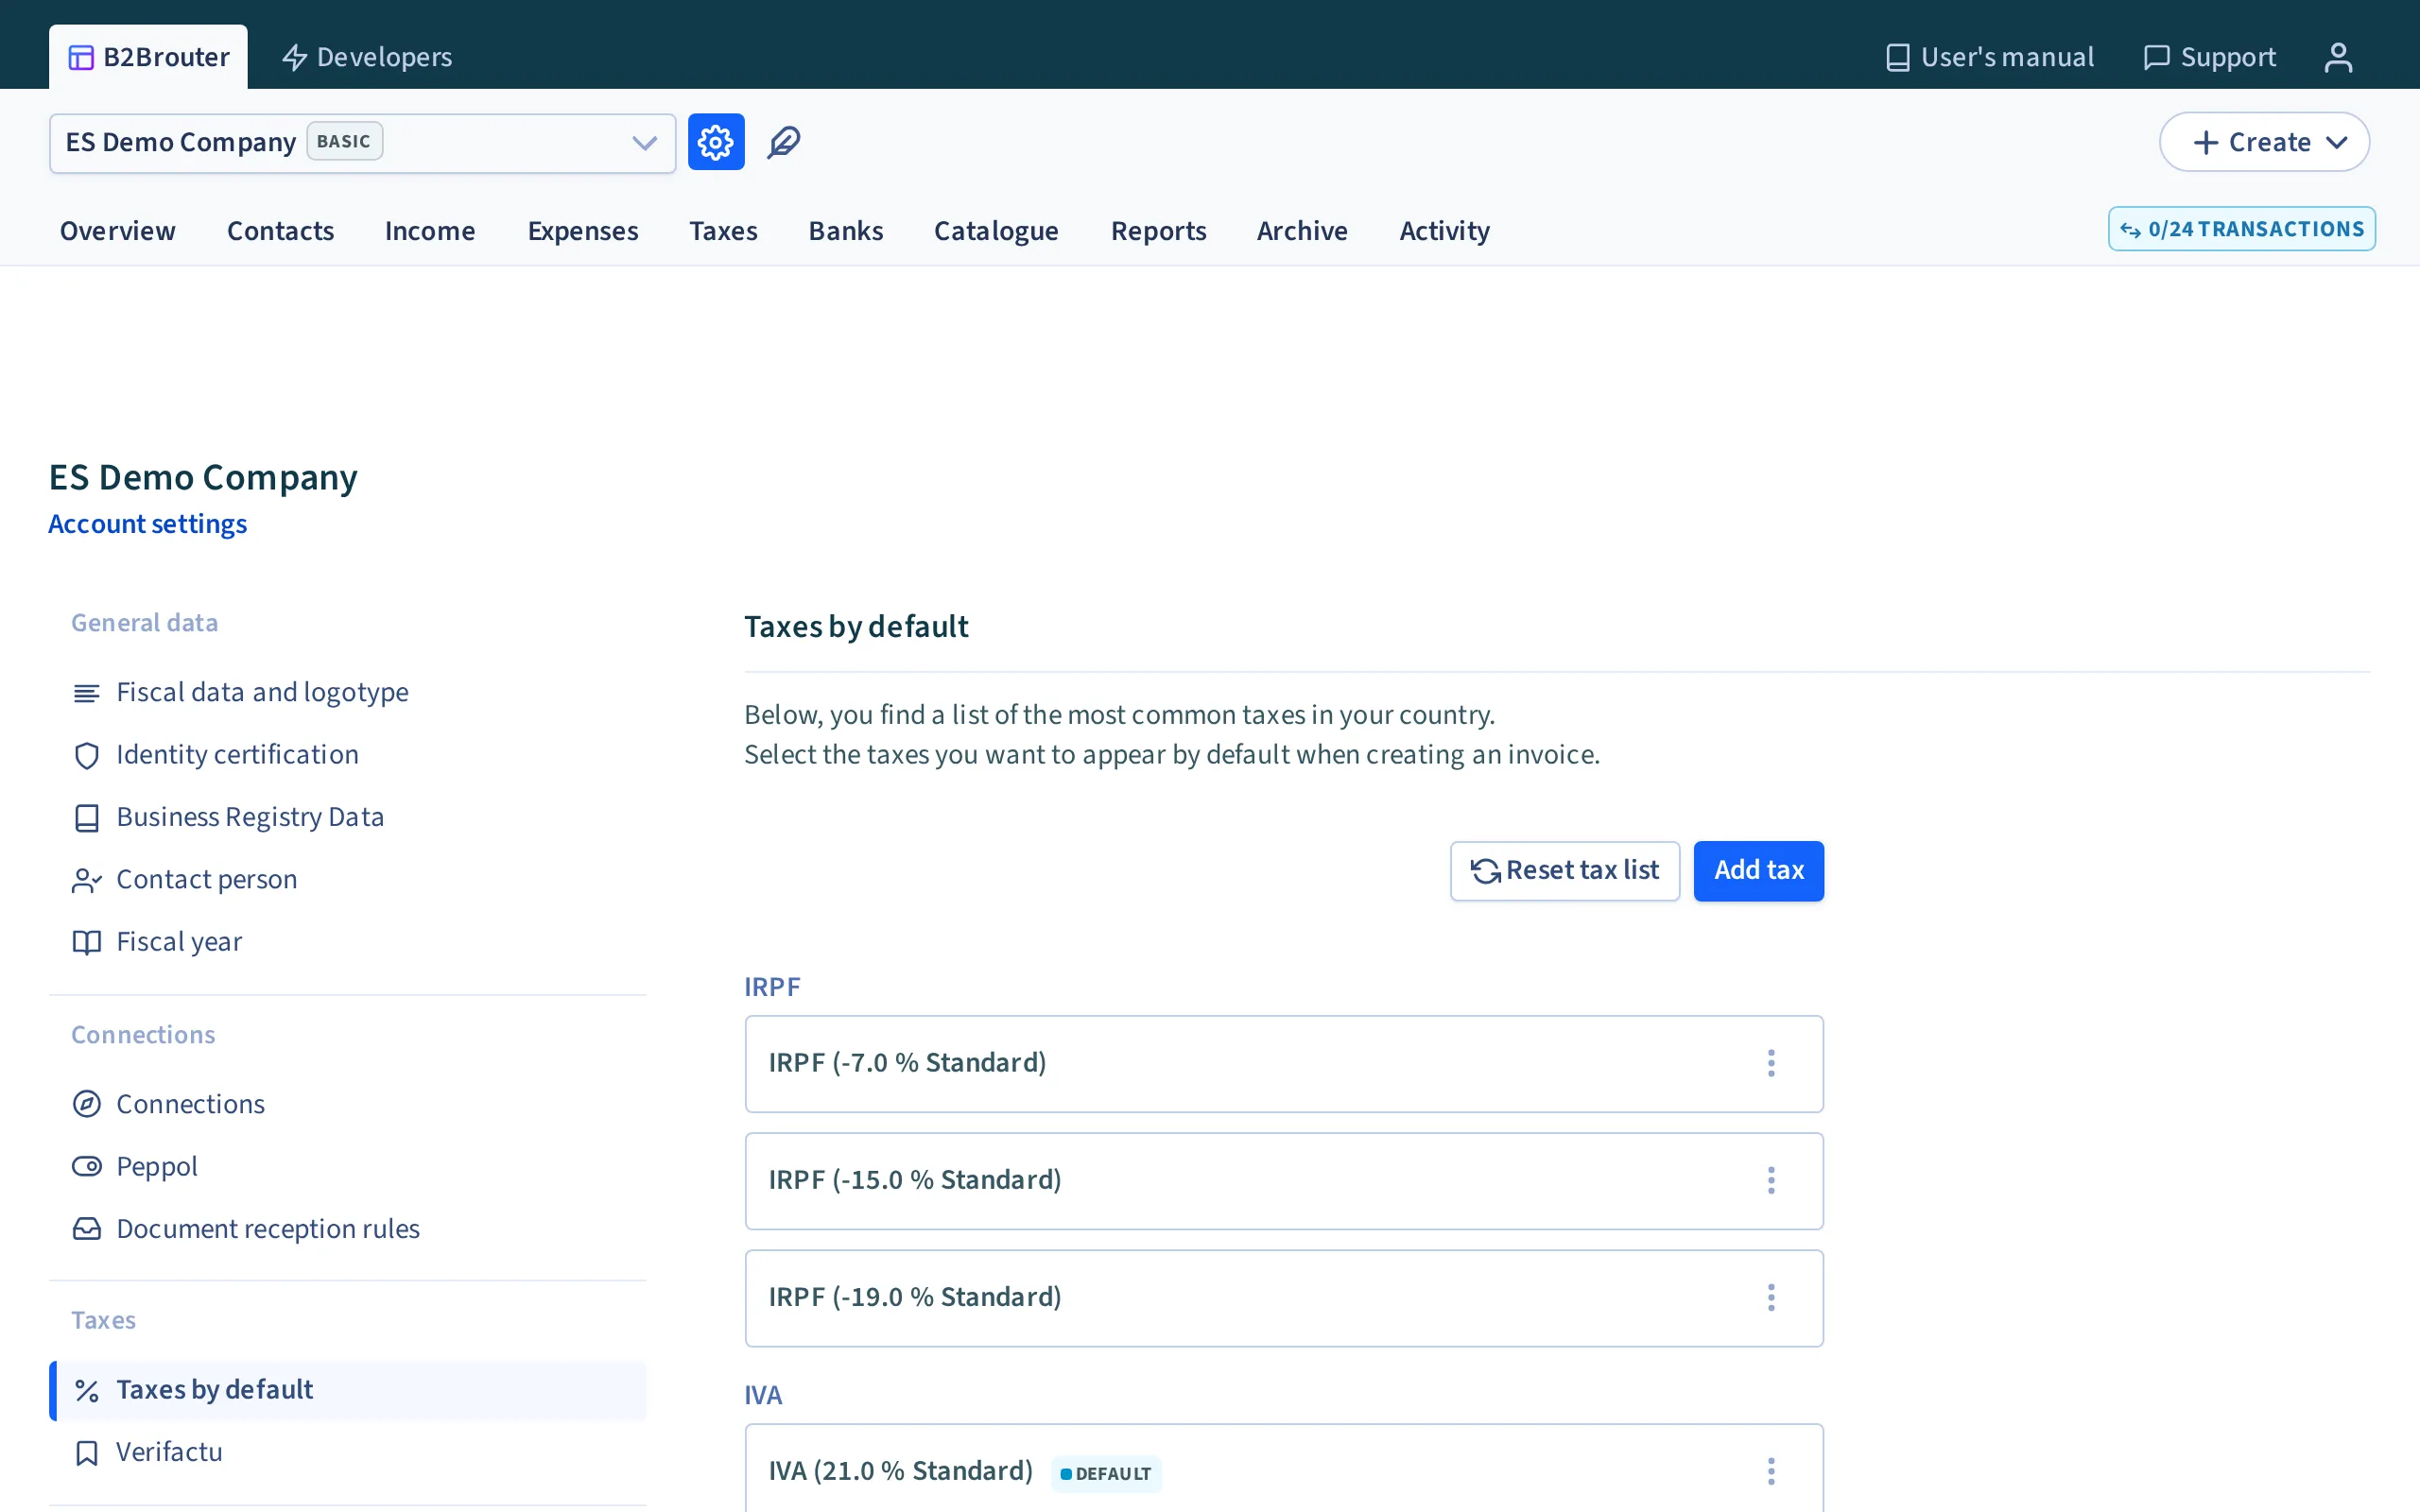
From this section you can delete or add the taxes that you can later apply to the invoices you generate.
When you create the account, B2Brouter gives it a tax catalogue based on the company’s country. In Spain it also depends on the company’s postal code: IVA in the mainland and the Balearic Islands, IGIC in the Canary Islands (postal codes 35 and 38) and IPSI in Ceuta and Melilla (51 and 52), plus IRPF in all areas.
The catalogue belongs to your account and does not change with the customer. If you invoice a customer in another area or another country, add the tax you need: the ones you already have stay, and you choose which one to apply on each invoice.
To add taxes:
- Use the Add tax button and access the form at the bottom of the list,
- In the Name box, select the tax from the available drop-down options or add it manually. We recommend picking it from the list: the name decides the tax code that is sent in the electronic invoice.
- From the Category drop-down, you can select the category of the tax.
- In the Percentage box, add the percentage of the tax. The sign decides the effect: a positive percentage adds the tax to the total (charged tax) and a negative one subtracts it (withheld tax). A withholding tax, such as IRPF or IRNR, must be created with a negative percentage, for example -19 or -15.
- You can check the Enable by default option and the tax is added by default when you generate the invoice.
Finally, use the Add tax option and the tax is created and saved.
Keep in mind:
- A charge does not replace a tax. If you enter a tax such as IPSI as a charge, the line has no tax, and formats such as Facturae do not let you issue the invoice.
- The catalogue is the same for all invoice types, simplified invoices included. If an invoice needs two different percentages of the same tax, turn on Apply by line on the invoice.
- Correcting a tax in the catalogue does not change the invoices that already carry it. On a draft, remove the old tax from the line and add the corrected one.
To delete a tax: Use the three dots icon to the right of each tax and use the Delete option to remove the tax.
Tax reports
Section titled “Tax reports”In this section you can set up the tax reports available to file with B2Brouter.
Collection
Section titled “Collection”From this section you can add the bank accounts of your company that you can select to collect invoices, as well as define the default collection method for new customers.
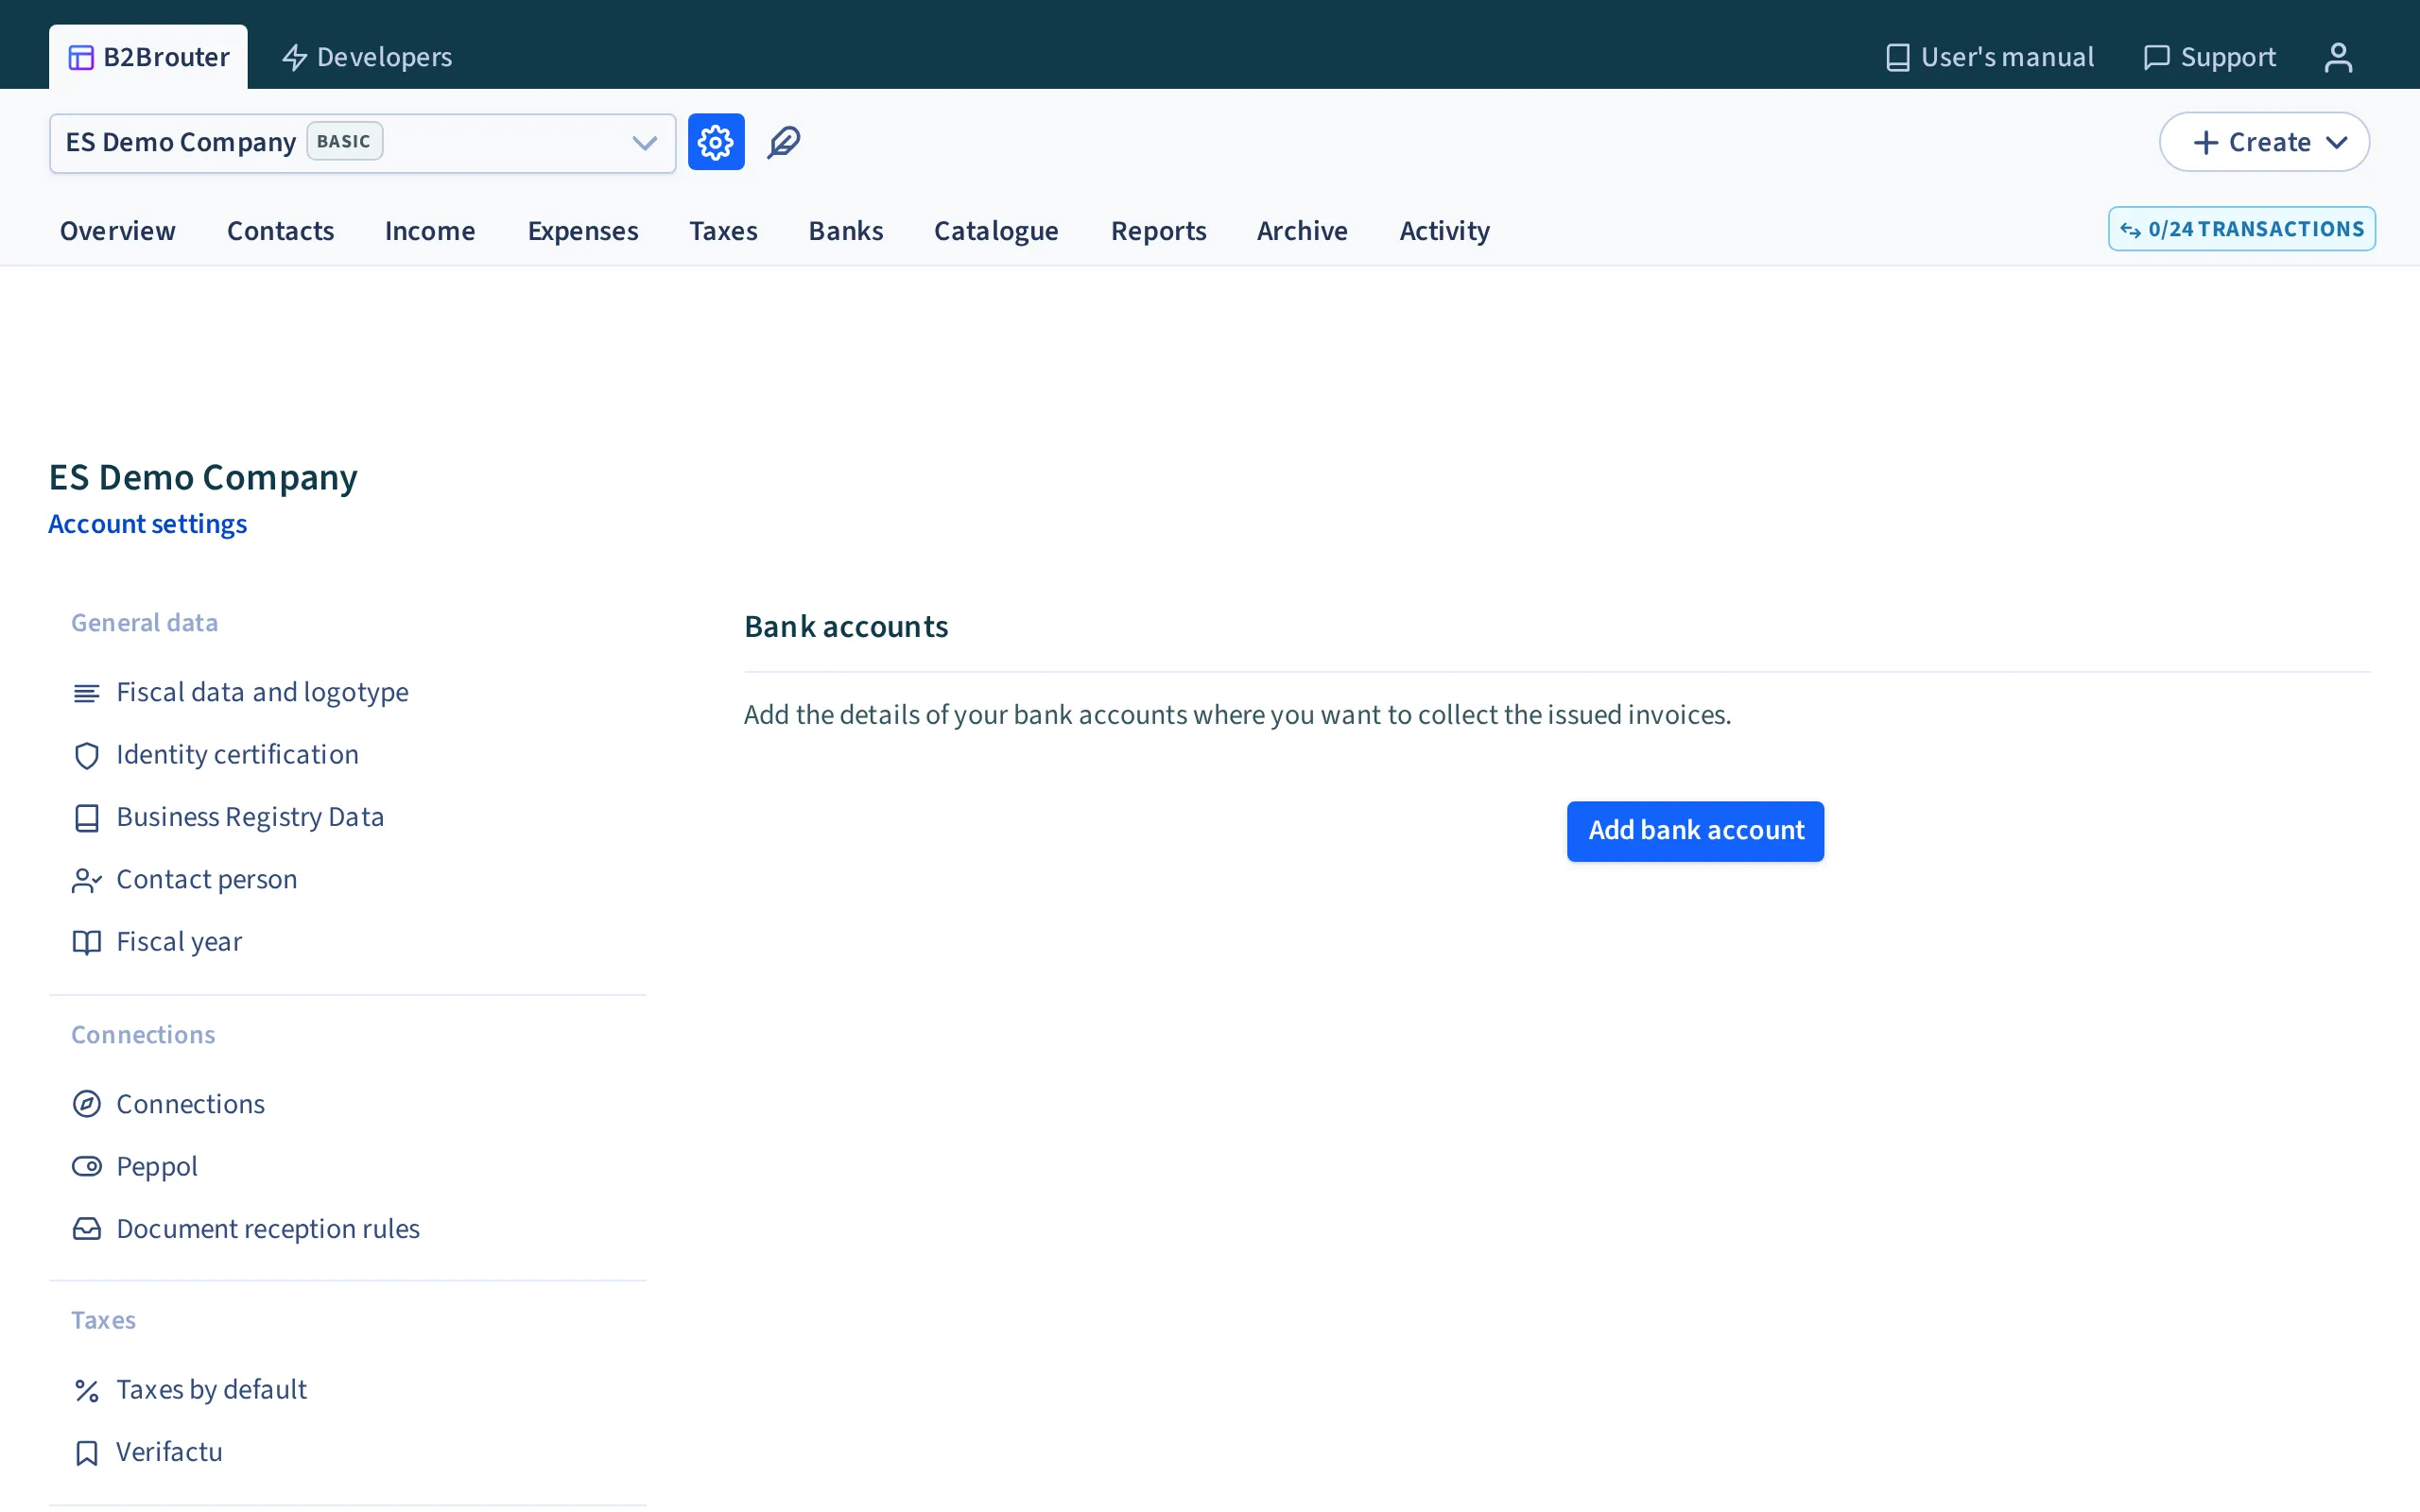
Bank accounts
Section titled “Bank accounts”To add bank accounts:
- Add the information in the form.
- In Name you can assign a name to the bank account you are adding.
- In the drop down Account type you have to select whether you want to add an IBAN or a Bank Account.
- Depending on the type of account you select, add the IBAN or the Bank Account coding.
- In BIC you can add the BIC code.
- On the Professional plan and above, the other data of the bank account include the SEPA suffix field, set to 000 by default. The suffix is part of your creditor identifier in the SEPA direct debit files. Once the account is saved, the text under the field shows the resulting identifier. Change it only if your bank gives you a different suffix.
Finally, to save your changes, use the Add bank account option at the bottom of the page.
To delete bank accounts: Use the three dots icon to the right of each line and use the Delete option to delete the bank account.
Default payment method
Section titled “Default payment method”From this section you can configure the default payment method, and it is used for each new customer you create. If you need to, you can also customise this payment method for each customer or for each invoice:
- In the Payment method option, select the collection method you want to use by default on invoices.
- In the Due date drop-down, you can select a due date for invoices. The Personalised, I will choose the date on each invoice option stores no due day: it means you choose the due date on each invoice, with the invoice’s Custom option.
Finally, you can apply all these options that you have configured for all customers. To do this, use the Apply this payment method to all existing customers option.
eAccounting
Section titled “eAccounting”B2Brouter allows accountants to connect with their clients to automate the reception of their clients’ electronic invoices in their accounting software or to download them directly from the platform.
It is important to note that the client of the agency, i.e. the account that connects to eAccounting, must have a Premium plan.
Establishing the connection
Section titled “Establishing the connection”The connection between accounts is established by means of an invitation that can only be sent by the agency, and it is the client who has to accept or refuse it in order to connect. There are two options to do this:
Option 1. The customer is a B2Brouter user.
Section titled “Option 1. The customer is a B2Brouter user.”- Go to the Account Settings (gear icon at the top).
- Then select the eAccounting section located on the left side menu. From here you can manage your connection with your account manager.
Option 2. Customer is not yet a B2Brouter user
Section titled “Option 2. Customer is not yet a B2Brouter user”- Open the email sent to you by your accountant with the invitation.
- Click on the option View invitation. You will be redirected to the B2Brouter platform.
- Click Accept invitation to connect to activate the connection. If you do so, all your invoices will be automatically sent to your accountant, and he will be able to view the sections: contacts, invoices issued, invoices received, taxes, collections, payments and SEPA files.
The connection can be deactivated, deleted and re-established by both the account manager and the client.
Integration of client invoices with the accountant
Section titled “Integration of client invoices with the accountant”When integration is established, all sent invoices and receipts are automatically sent to the accountant.
- Invoices are integrated when their status is ‘Sent’.
- At the index of the customer invoices there is a label informing about the status of the invoice. These can be:
- Pending: The invoice has not yet been integrated or downloaded.
- Processed: The invoice has already been integrated or downloaded.
- Modified: The invoice has been modified after having been processed.
Settings
Section titled “Settings”Invoices and quotes
Section titled “Invoices and quotes”From this section you can customise some aspects of your account.
What you can customise in the PDF template
Section titled “What you can customise in the PDF template”All the invoices and quotes you issue are generated with the same PDF template. The template cannot be replaced or edited per account. This is everything you can change:
- The logotype, from the Fiscal data and logotype section. It is the only image you can add.
- The appearance, with Default view or Classic view.
- The data source, with the XSLT method for invoices created from an original XML file (Professional plan or higher).
- The footer texts, with Legal text and data protection and with Note on the invoice (Professional plan or higher).
- The elements you want to hide, with Hide email and Hide additional delivery address information (Professional plan or higher).
- The product code of each line, with Show product ID on invoice (Professional plan or higher).
You cannot add any other image (a stamp, a scanned signature, a letterhead), nor a new text block, nor change the position, colours or typography of the elements. The only other image that can appear on the PDF is the QR code of the tax report, which B2Brouter adds automatically when the invoice is reported to an authority that requires it (for example Verifactu or TicketBAI).
If you need a stamp or a document to accompany the invoice, you have two options:
- Include the stamp in the logo file. Bear in mind that this changes the logo on all your documents.
- Attach the file to the invoice from Additional files in the invoice form. See Create and send an invoice.
PDF document view
Section titled “PDF document view”In this section you can choose the appearance of the PDFs your customers receive. Select Default view or Classic view.
PDF data source
Section titled “PDF data source”Available with the Professional plan or higher. When an issued invoice has been created from an original XML file (for example, imported or created through the API), you can choose where the PDF data comes from:
- Standard method: the PDF is generated with the B2Brouter template, in the view you have chosen.
- XSLT method: the PDF is generated directly from the original XML, so no data in the original is omitted and no amounts are modified. The appearance of the document differs from the default and classic views, and it does not include the logo.
The XSLT method is not available for all formats or all languages. When it cannot be applied, or if you have modified the invoice after creating it, the standard method is used.
Legal text and data protection
Section titled “Legal text and data protection”In this section you can add a legal text that is displayed by default in the footer of all invoices.
Write the text for each language with the language selector. The text is added to each new invoice in the contact’s language, and you can edit it invoice by invoice.
Invoices and quotes
Section titled “Invoices and quotes”From this section you can:
- Activate the Generate invoice number automatically option if you want the system to provide you with the invoice number automatically, taking into account the numbering of the previous invoice (as long as you follow a correlative numbering).
- Activate the Apply taxes per line option if you want the system to calculate the taxes per line for all your invoices by default.
Discount and additional charge
Section titled “Discount and additional charge”- Use the drop-down options to indicate whether you want discounts or charges to be shown as a percentage or as an amount.
- You can also activate the Apply tax option if you want amounts to be applied to discounts or charges you add to invoices.
Hide elements from view
Section titled “Hide elements from view”Available with the Professional plan or higher. Define the elements you want to hide from the view of the issued invoice and quotes:
- Hide email: the PDF does not show the email addresses in the issuer and customer data blocks.
- Hide additional delivery address information: the PDF does not show the delivery information block (date, recipient and delivery address).
Catalogue
Section titled “Catalogue”Available with the Professional plan or higher. Enable Show product ID on invoice so that the PDF shows, on each line that has one, the item code as Seller product ID. The option is also enabled by default on new catalogue products.
Note on invoice
Section titled “Note on invoice”Available with the Professional plan or higher. Configure this section to create a legal text that will appear by default in the footer of the invoices:
- Select the language in which you want to configure the text.
- In Invoice note add the text you want to appear on the invoices.
The text is added to each new invoice in the contact’s language, and you can edit it invoice by invoice.
Recurring invoices
Section titled “Recurring invoices”Once you have generated a recurring invoice, you can use this option to activate the automatic creation of the following recurring invoices. The invoices are created as Draft and are not sent by themselves: you must review and send them. More information in Recurring invoices.
Imported invoices
Section titled “Imported invoices”From this section you can choose the type of rounding you want to give to your imported invoices:
Roundings (only for imported invoices).
Section titled “Roundings (only for imported invoices).”This setting only applies to imported invoices, but does not apply to manually generated invoices:
- Select from the dropdown which type of rounding you want to use: Round half up, Bank rounding, Truncate decimals.
- You can activate the Round before sum option if you want the rounding to be done before adding up the invoice total.
Invoice sending method for new contacts
Section titled “Invoice sending method for new contacts”Configure a default sending method for all your customers, in cases where you import invoices and you have not created the customer in B2Brouter.
What is a B2Brouter transport?
Section titled “What is a B2Brouter transport?”Transports are the various mechanisms available for sending and receiving documents.
Some of the transports require a specific configuration within the account. These are: B2Brouter, email, Peppol Network, Eusko Jaurlaritza, Junta Castilla-La Mancha (Pecamos), SDI (Sistema diIntercambio) and Ediversa Network, among others.
We can classify them in three different blocks.
| B2Brouter’s own transports | Open Network transports | Private Network transports |
|---|---|---|
| B2Brouter | Peppol Network | AS2 Carrefour |
| FACe | Pagero Network | |
| Download | eFACT Catalunya | Basware Network |
Attached documents
Section titled “Attached documents”When attaching documents to an invoice, depending on your preferences, they can go inside or outside the XML. Therefore, there are two options:
- Transport ‘without embeeddedattachments’: The invoice is sent and the attachment is sent separately, it does not go inside the XML.
- Transport ‘detached’: the attachment is embedded inside the XML.
What are B2Brouter document types?
Section titled “What are B2Brouter document types?”The document type is the format of the file to be sent or received through a transport.
Examples of formats are PDF Invoice, XML, InvoiceE, Peppol BIS3 Invoice, Peppol PINT JP Invoice, XRechnung UBL Invoice, Chorus Invoice and EDIFACT among others.
What is the B2Brouter shipping method?
Section titled “What is the B2Brouter shipping method?”The sending method indicates the means of transport and the type of document to be used for transmission. It is the combination of the type of transport and the type of document.
Invoice series
Section titled “Invoice series”You can define here whether you want to manage the numbering manually or let the platform do it automatically:
- Automatic numbering: The platform assigns the numbering automatically and allows you to configure different numbering depending on the type of document. You can define which numbering to use by default in each case.
- Manual numbering: The platform suggests the next number taking into account the last one used for the same type of document, but will allow you to edit both the series and the number manually.
To activate the automatic series of your invoices:
- Activate the button Use series to invoices.
- Define the Separator. Select the separator between series and number.
- Save your changes with the Save button.
Important: If your company is registered in Spain, this option will appear enabled by default. This behavior is applied automatically during account creation to ensure the proper functioning of specific processes, such as the generation of corrective invoices, which necessarily require a series. This parameter can be modified later from this same section if needed.
Electronic signature on invoices
Section titled “Electronic signature on invoices”There are two ways to sign your electronic invoices in B2Brouter.
Delegated signature
Section titled “Delegated signature”The delegated signature authorises B2Brouter to digitally sign documents on your behalf. This is used by default whenever you send an invoice from the platform — no additional configuration is needed.
Own signature
Section titled “Own signature”To sign invoices with your own signature, you need an up-to-date digital certificate from your company:
- Use the Select file option to search for the file in your system and upload it to B2Brouter.
- You can upload .pfx or .p12 certificates.
Once you have configured the sections you need, save the changes using the Save option.
Signing according to your plan
Section titled “Signing according to your plan”Depending on your plan, the available signing options differ:
- Basic: All invoices are signed automatically with B2Brouter’s delegated signature. Invoices sent in PDF format are not signed.
- Professional: Invoices are signed by default with the delegated signature (except PDF invoices). With your own certificate, you can sign all invoices, including PDF invoices.
- Business: Invoices are signed by default with the delegated signature, including PDF invoices. With your own certificate, you can sign all invoices with it.
The signature is not printed
Section titled “The signature is not printed”The electronic signature is data inside the file. It is not drawn on the invoice, and there is no option to print it.
- On the electronic invoice, the signature is inside the file you see in the Legal view.
- On a signed PDF, you check the signature in the signature panel of your PDF reader.
If your customer needs a signed document, give them the electronic invoice (for example, the Facturae), not a printed copy.
Email notifications
Section titled “Email notifications”Available with the Professional plan or higher. Configure notifications of status changes via email:
- Add the email where you want to receive the notification, in the corresponding box indicate the type of document and the related status change.
- You can add several recipients by entering different emails separated by commas.
The received invoice notice works like this:
- On the Basic plan, the notice goes to the email in the Contact person section.
- On the Professional plan or higher, the notice only goes to the addresses in the Received invoices box. If you move from the Basic plan to a higher plan and the box is empty, you stop receiving the notice. Invoice reception stays the same.
- Invoices sent to you by another B2Brouter account always trigger the notice. If the box is empty, it goes to the Contact person email.
- The notice carries a link to the invoice in B2Brouter.
- There is no notice for received invoices you create yourself with the form, or when the Automatically reject invalid documents option is on (see «Document reception rules»).
Email messages
Section titled “Email messages”Available with the Professional plan or higher. Customise the text of the email you send invoices or quotes with. The fields are shown directly, with no option to activate:
- In Language, select the language of the message you wish to customise.
- In Message for invoices, you can customise four parts: Subject, Body, Details and Email footer.
- In Message for quotes, you can customise the Subject and the Body.
You can use these variables, which the email replaces with the data of each document: @company.name, @client.name, @client.email, @invoice.series_code, @invoice.number, @invoice.date, @invoice.due_date and @invoice.total. In quotes, use @quote.number and @quote.date. Write them exactly like this: a misspelt variable appears as it is in the email.
Only the text is customised, not the typography. If your account has a logo, the email shows it in the header. The email that tells the customer you have received the payment of an invoice is not customised here.
To go back to the standard texts, use the Reset default settings option. Once you have configured the sections you need, save your changes using the Save option.
The «View invoice» button
Section titled “The «View invoice» button”The email you send an invoice with carries a button that opens the invoice in B2Brouter. It is on by default. To remove it, turn off the Show “View invoice” button in sent emails option, in the Email connection (see «Connections»).
If a contact receives invoices by E-mail link, the button is the delivery: without the button, they get an email without the invoice.
Organisational units
Section titled “Organisational units”Organisational units
Section titled “Organisational units”This is an organisation related to your company, which uses the same VAT number but may have a different address or name:
Add an organisational unit
Section titled “Add an organisational unit”From this section you can create the headquarters of your company if you have one:
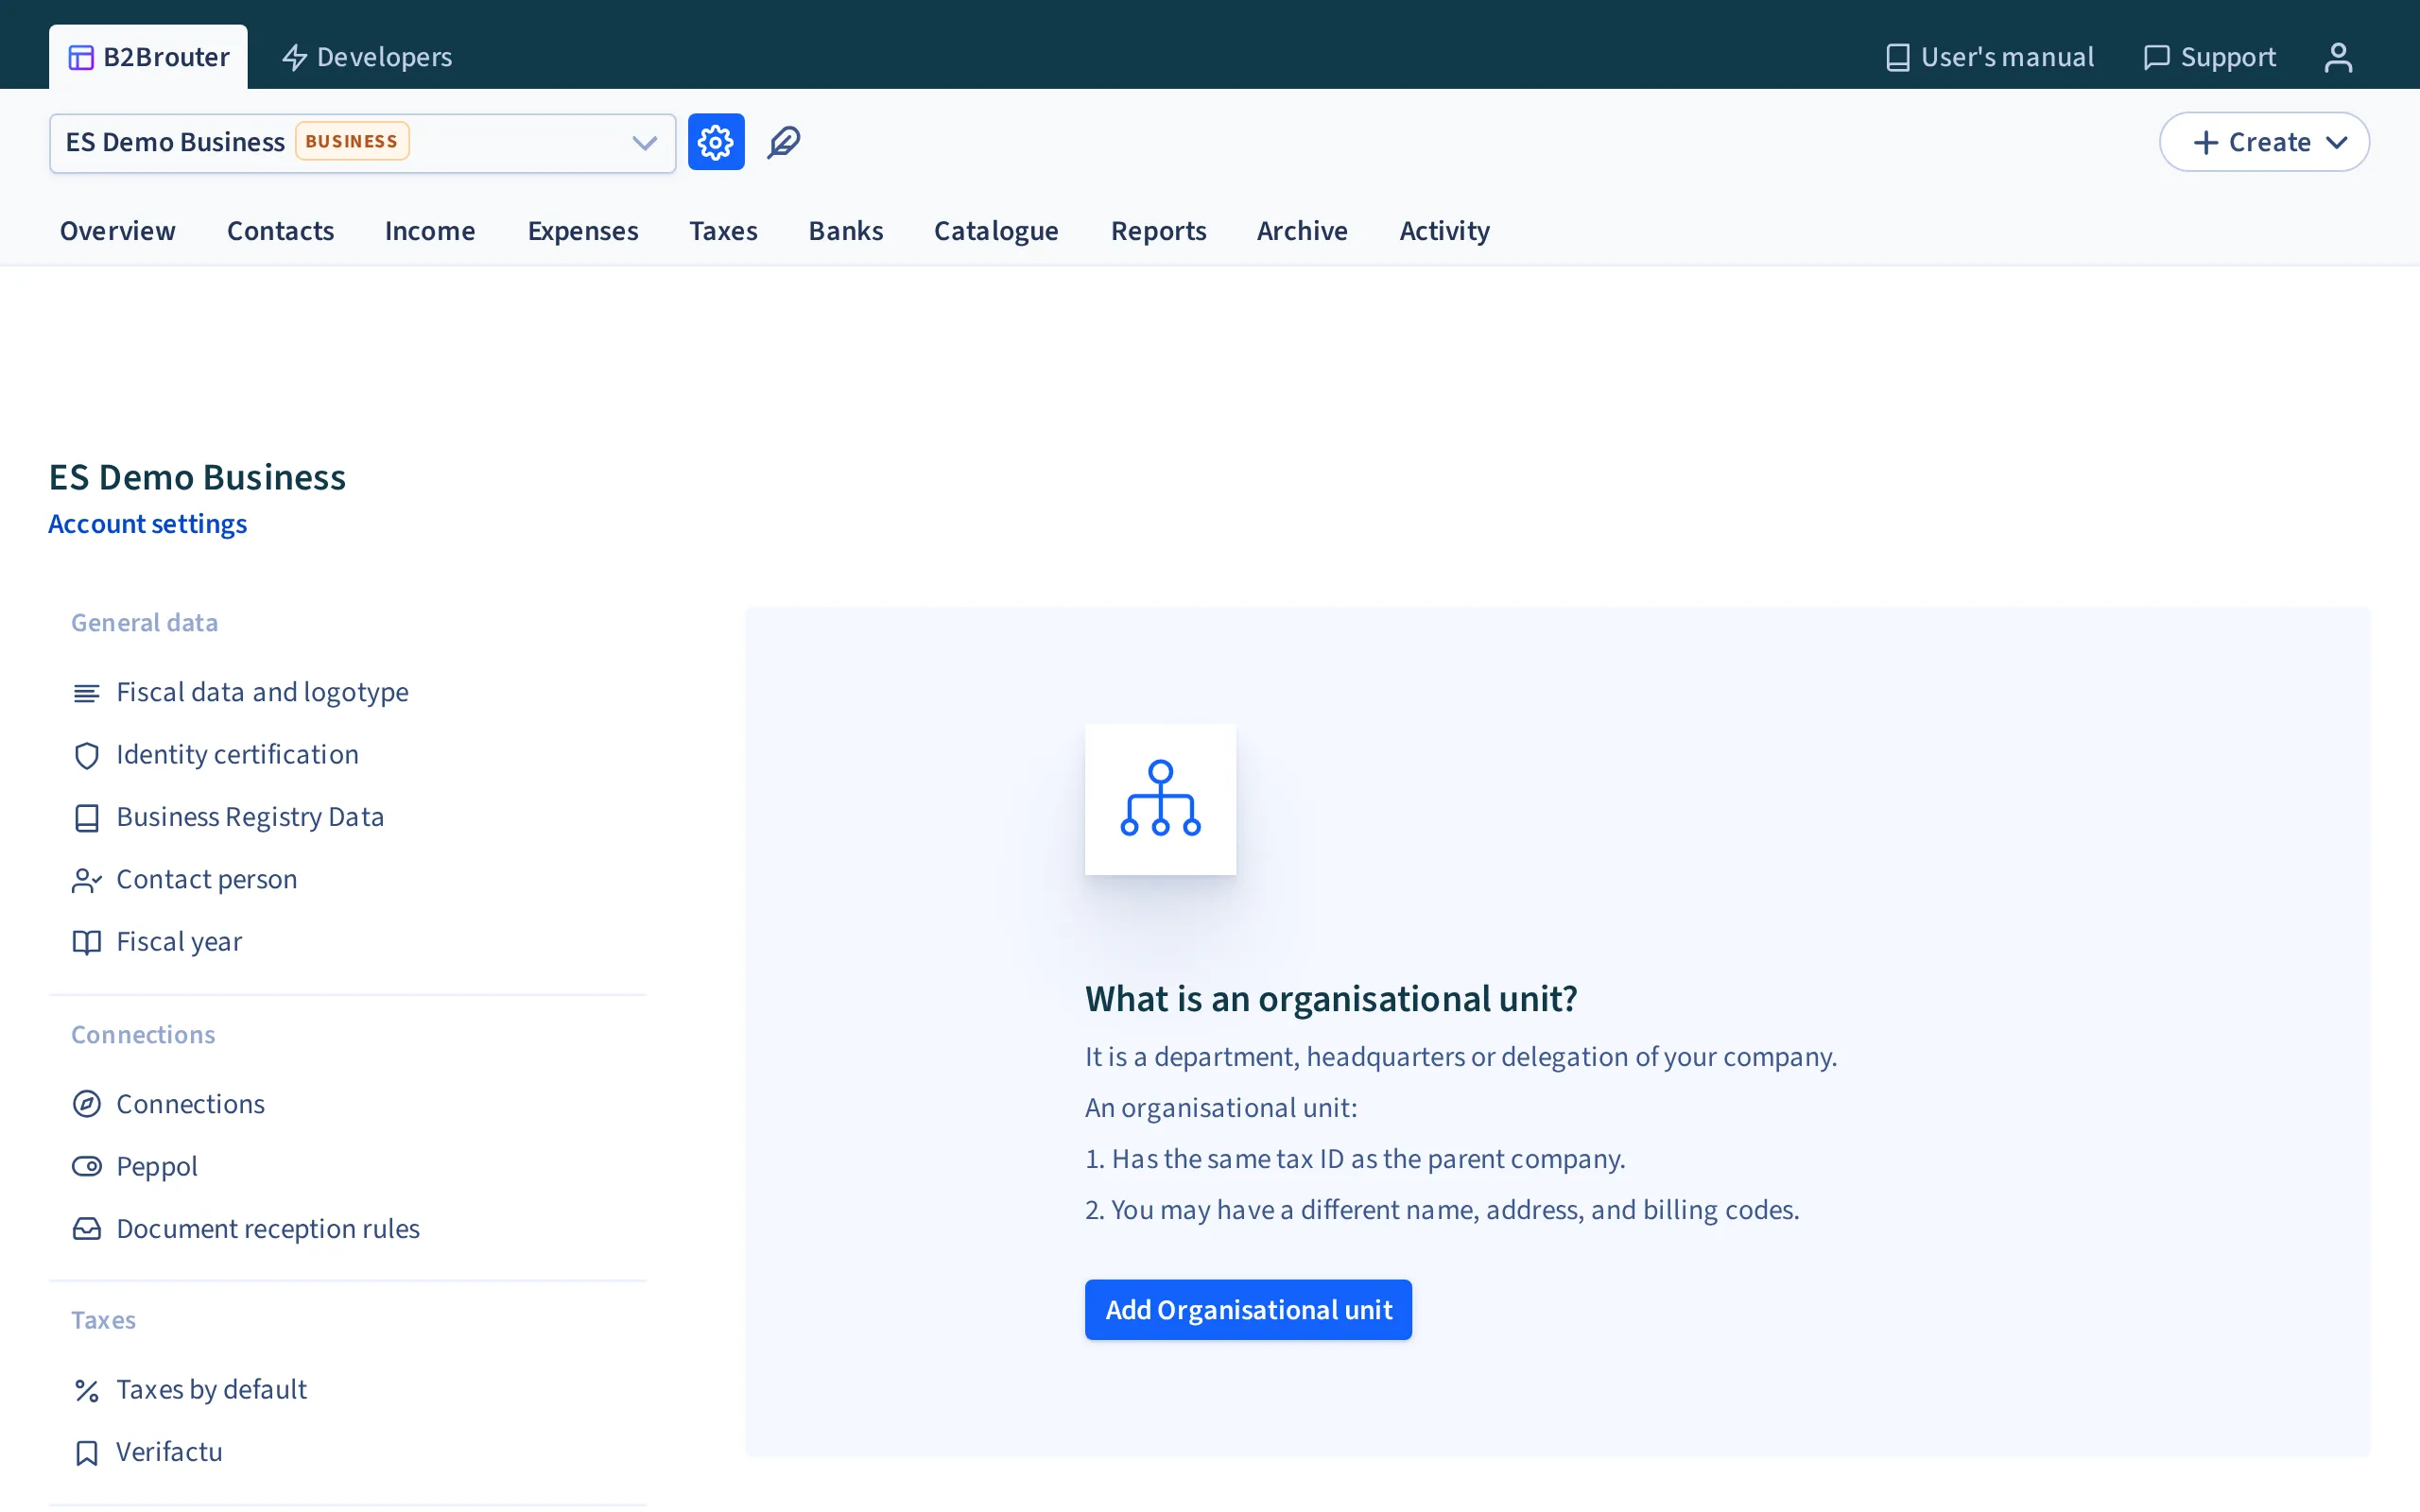
- Use the option Add organisational unit.
- Add the Fiscal data of the head office and use the Continue option.
- Add the information of the contact person of the head office.
Finally use the Continue option to create the head office. Navigate and access the different locations created via the additional drop down at the top of the page.
From this section you can add different users to your account so that they can manage electronic documents, customers and suppliers. You can grant roles to users to limit the access or actions they can perform.
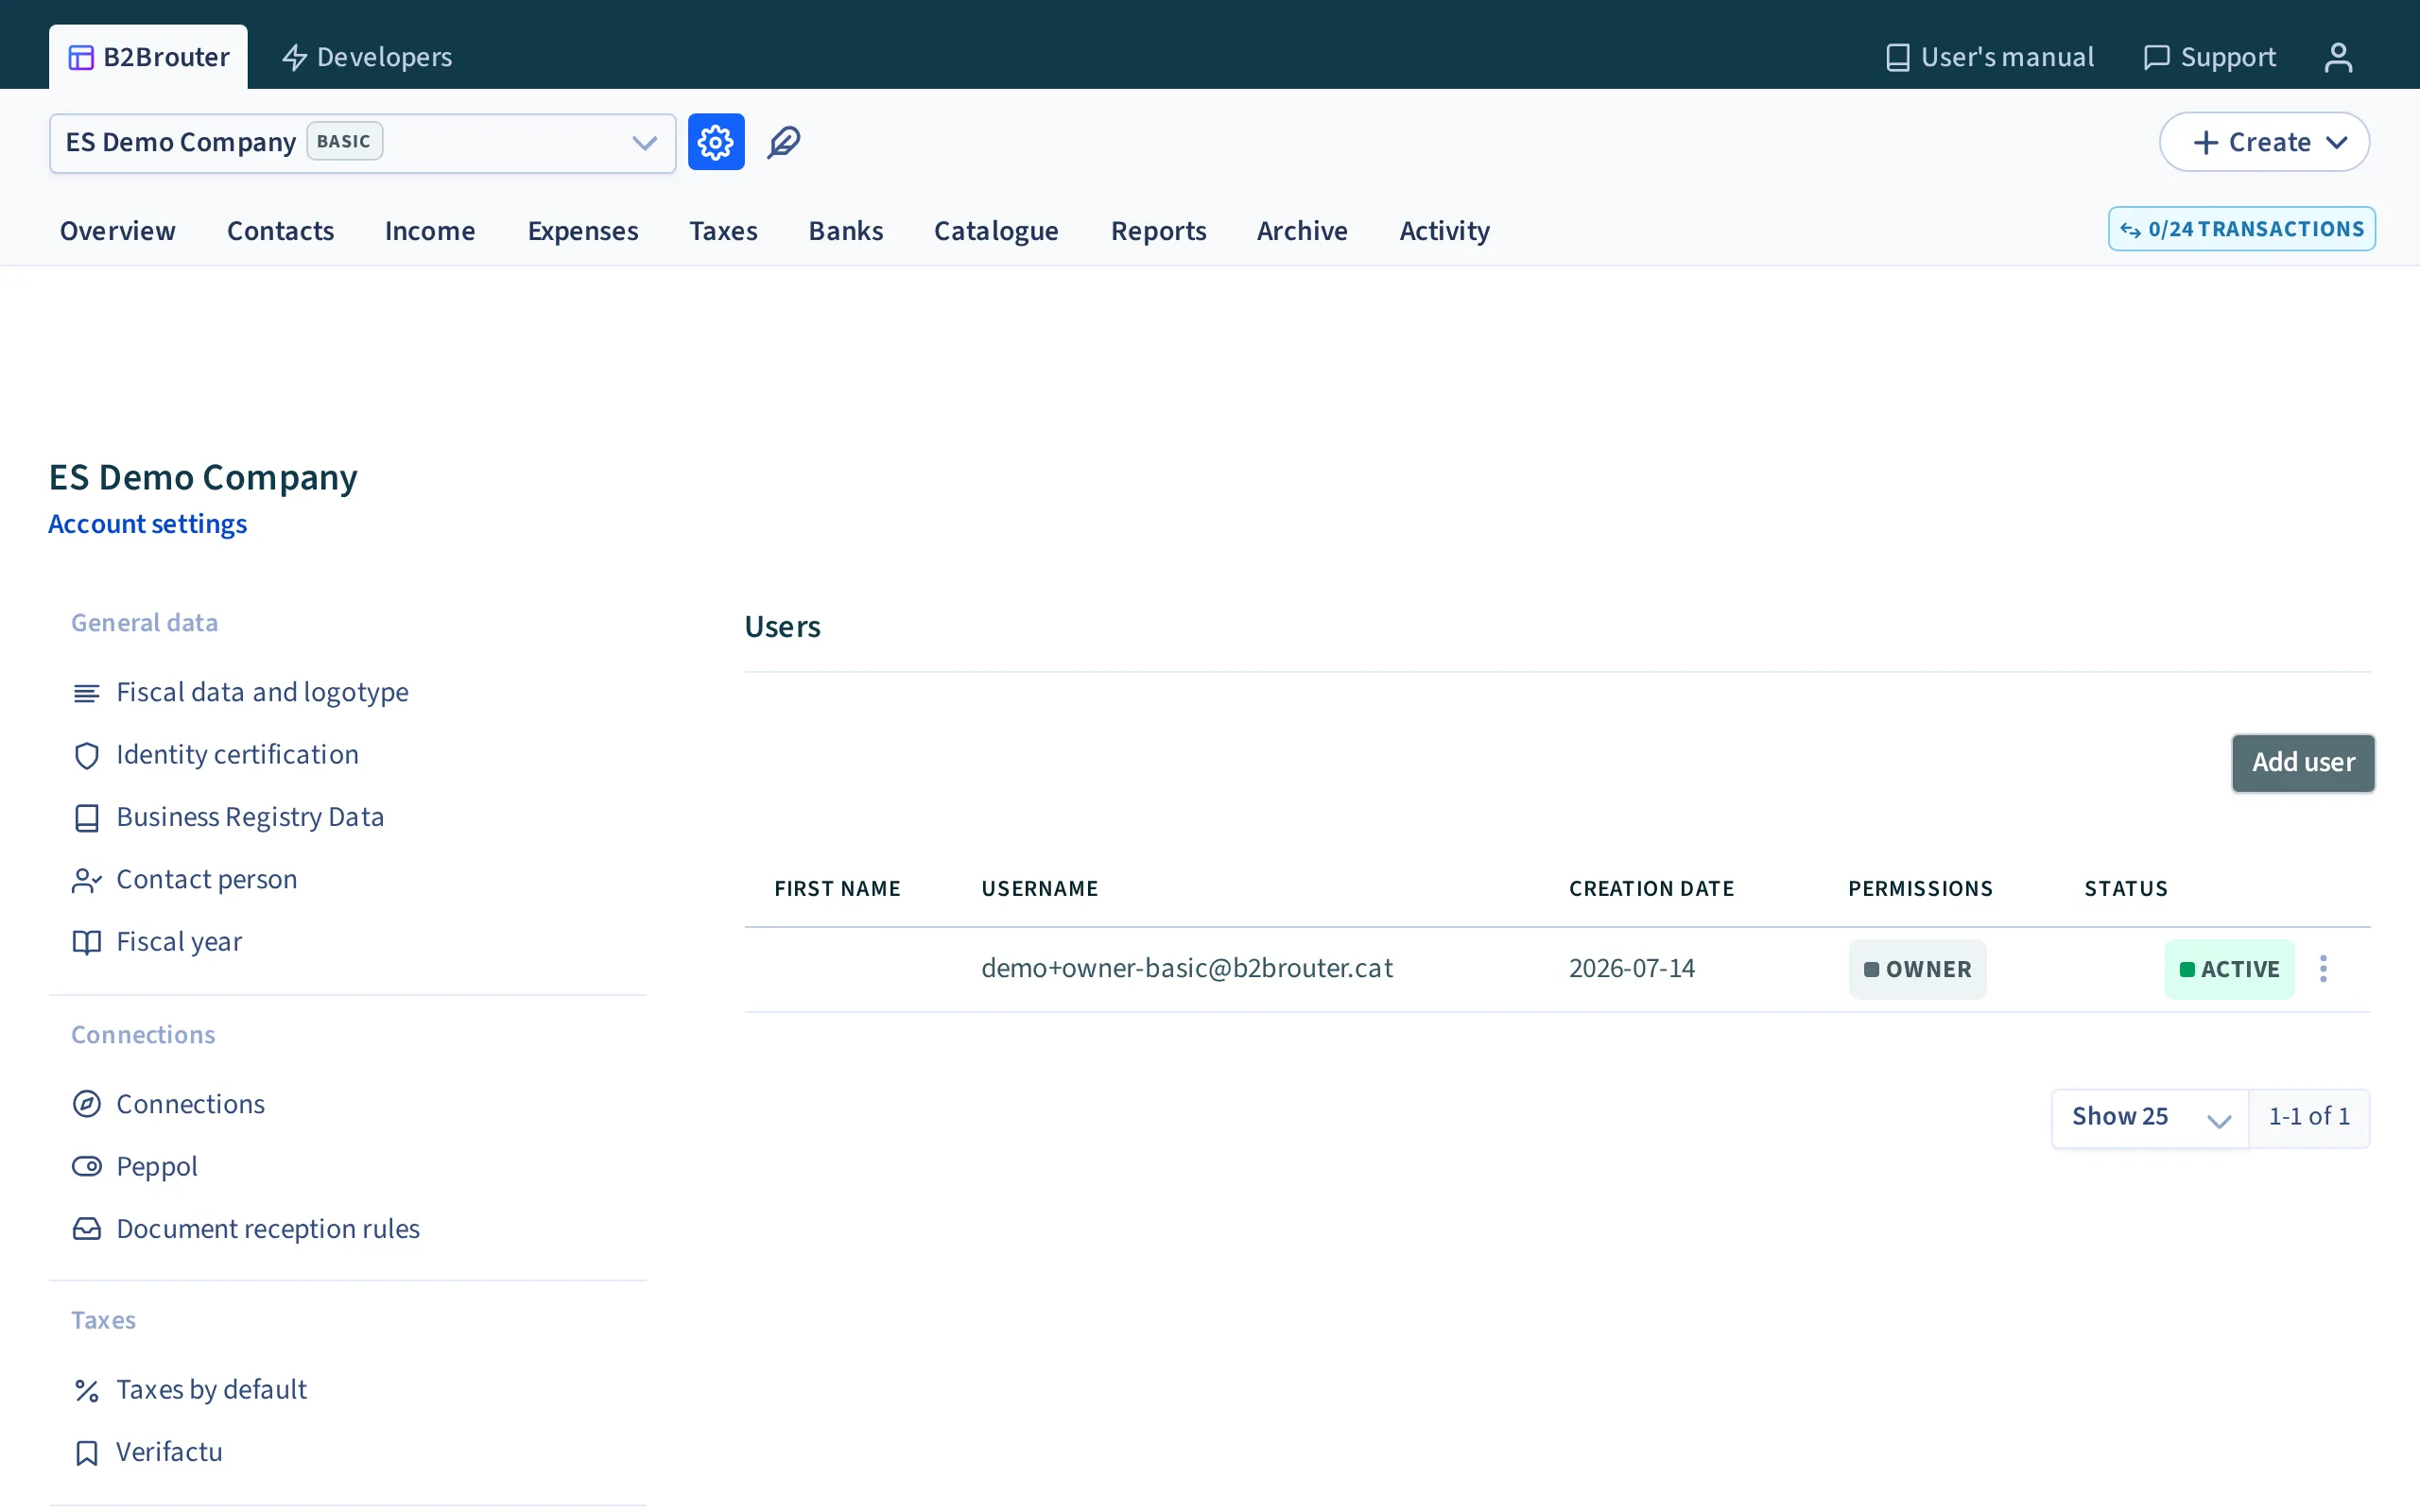
Add user
Section titled “Add user”Use the Add user option to add a new user to your account.
- In Email, add the email address of the user you want to invite to B2Brouter.
- In Permissions, select from the dropdown the permissions you want to grant to the user and check the sections you want them to have access to.
B2Brouter sends the invitation to the email address exactly as you typed it. Until the person accepts it, the user appears in the list with that address and the status Invitation pending.
If the invitation does not arrive
Section titled “If the invitation does not arrive”- First check that the address in the list has no typing error.
- If the address is correct, use the Resend invitation option in the three-dot menu to send it again. It goes to the same address, so it does not fix a typing error.
- To correct the address, remove the pending user (see Delete user) and add them again with the correct address.
Delete user
Section titled “Delete user”Click on the three dots next to the email address of the user you want to delete and use the Remove button.
Role of each permission
Section titled “Role of each permission”- Owner: this is the profile of the user who created the account. There can only be one owner and this owner can manage any parameter of the account.
- Administrator: this profile can manage any account parameter, except premium plan subscriptions.
- View and edit: this profile can view and edit the different documents that are managed from B2Brouter and customers or suppliers. It cannot configure any parameter of your company settings.
- View: this profile can only view the management documents from B2Brouter and customers, but can not modify any data.
Once the users have been configured, use the Save option at the bottom right of the screen.